Saturday, November 29, 2008

Winner, Winner, Turkey Dinner!

Well, Thanksgiving has past and I'm thankful that I didn't gain 10 pounds the day after! Just a quick report on the fried turkeys. We ended up frying two 12 lb turkeys, one was an organic turkey from Costco and the other, my usual and dependable Butterball. Both cost around the same price, I think.

The turkey in the back is the organic with a Cajun rub. The front is the Butterball with a salt, ground pepper, paprika and Thyme rub.


I forgot to take a picture of the Butterball because by the second fry, we were all starving and and I was working hard to get everything else on the table. But here's the organic and the Butterball looked similar.


Results: both were fried for the exact recommended amount of time (as per instructions) but the Butterball was by far the better turkey. The organic turkey's breast was dry and the drumsticks were just so-so, and the rub didn't penetrate the meat as much. The Butterball was moist and tender with great flavor, just like what I've read a fried turkey should taste like. Lesson learned. Now I know why I stick to Butterballs every year. Thank goodness we got the Butterball or else we would have been sorely dissapointed with frying.

Hope everyone had a great Thanksgiving!


Read more!

Wednesday, November 26, 2008

Happy Thanksgiving

Wishing everyone a wonderful and tasty Thanksgiving! Hope everyone eats well.


Read more!

Tuesday, November 25, 2008

Tuesday Ramblings

I'm cleaning up some old pictures on my Blackberry today so just a few ramblings on a couple of places I've eaten in the last week.

When the weather stays cool and even dreary like today, it's hard for me not to think of noodles everyday. Yesterday, I met some friends at Santouka Ramen for a quick bite to eat. These are the same friends who I used to meet at Chopstix at least twice a month for ramen (or katsu curry) fixes. But we haven't done that for a long time. Apparently, a couple of them have made Santouka their new lunchtime stomping grounds. All 5 of us ordered the shoyu ramen. I should have followed suit and ordered the large bowl because by an hour later, I was hungry again.


The broth on this day was very good and very hot, almost burned my tongue. The meat was very tender and I enjoyed all 3 pieces of it! The ramen was cooked al dente, just the way I liked it and I really enjoyed the pull to it. All in all, a good bowl of ramen. You can read about Kirk's (mmm-yoso) meals here and here.

Santouka Ramen
4240 Kearny Mesa Rd
(Mitsuwa Marketplace Food Court)
San Diego, CA 92111

Another place that I wanted to mention is Caliente Mexican Food. It was my first visit and stopped by for lunch at the invitation of a friend (one of the Ramen boys). Caliente is one of those local small Mexican eateries that draw a lot of business from the surrounding business buildings. I used to drive by all the time but just never stopped in for a bite to eat. Mainly because I end up at Primo's on Mira Mesa. But that's another post.

Caliente offers daily specials at a decent price. On this day, one of the daily specials was 2 carni asada tacos with rice, beans and a soda for about $6. Can't beat that.


Sorry the shot of the inside is a bit blurry but you can see the guacamole (those premade kind, a bit watery) and the salsa. The tacos were decent size and the meat was a little bland but nothing a good douse of hot sauce won't cure!
The only thing about Caliente is that it takes a while to get your food from the time of order, and this is before the lunch crowd rushes in. By the time we left, there was a huge line out the door and most of the tables (only outside seating) were taken. Get there before noon to avoid the lunch rush.

Caliente Mexican Food
11815 Sorrento Valley Road #F
between Carmel Mountain Rd & Industrial Ct)
San Diego, CA 92121
858) 259-9579


That's it on this dreary Tuesday. I hope everyone has a wonderful Thanksgiving holiday!! Now go and eat well.


Read more!

Sunday, November 23, 2008

Thinking about Thanksgiving

So it's Sunday morning, I'm sitting at the computer with a cup of coffee and a Spam musubi I made yesterday (breakfast of champions!) and all I can think about is the Thanksgiving meal coming up. About a month ago, the Mister, without any provocation from me, blurted out, "I want a turducken for Thanksgiving." I knew he meant business just from his tone. Hoo boy. This is not the first time he's mentioned it before but for some reason, my heart started pounding and all I can think of was how the heck am I going to do this right?

I immediately began my search for a place to order one since I've already researched how to make one last year and wasn't sure I wanted to go that route. Turduckens are a bit expensive, whether you order one or make your own. Granted it's not that much more expensive than getting an organic free-range turkey but the shipping cost if ordering by mail does add up.

I also started to read some reviews on Chow and other food forums and to my surprise, a good number of people didn't care for turduckens, some said it was okay but nothing special. Nothing special? I'm going to pay $130 for a nothing special meal?? Hmmm, let's rethink before I commit. Up to now, I have yet to commit to the Mister, just said I'll look into it, hehe.

I calculated I could make one for about $50-60, including 3 different stuffings. But I would have to start at least 48 hours before dinner to complete this task. Still, no guarantee that we would like it. I mean I think anything with duck would taste wonderful (ahhh, roast duck!) but those "nothing special" comments kept haunting my thoughts. And have you ever had those moments where the more you thought about something the more you talked yourself out of it? Yeah, I was there.

Time for a little chat with the Mister. I told him I was not so worried about the "nothing special" comments but the fact that I won't be off work before Thanksgiving and that it will take some time (bought or homemade) to cook that sucker. And for something this labor intensive, I don't want to be rushed. If I was off that whole week, it would be a different story.

I suggested we (I) try our (my) hands at frying a turkey instead. He agreed. Then I felt bad because I know he had his heart set on it. He even said he would still like to try one someday. So I offered that if he still wants one come Christmas, I'll make one since I'll be off for 2 weeks. The deal was struck.

Oops, now I had to figure out how to fry a turkey without blowing myself up. Ironically, a perfect example of going from the frying pan into the fire. After more research and watching some funny (and very scary) videos on YouTube of stupid people frying turkeys, I decided to order an electric turkey fryer from Masterbuilt. It should be here tomorrow. And the turkey is in the refrigerator, thawing (and a second one in the freezer ready to be thawed).

So after my not-so-short story, here's the menu for Thanksgiving (whew, anyone still awake out there??):
  • Fried turkey (or 2)
  • Rustic Rolls (made yesterday and in the freezer)
  • Red potato and sweet onions
  • Candied sweet potatoes (making on Wednesday)
  • Cranberry dressing
  • Pumpkin Pie (making the pie crust today and freezing)
  • Chestnut stuffing (the MIL will be making this)
  • Sauteed green beans (MIL, too)

Oh yeah, I forgot to mention that I'm planning on making some torpedos using the French bread recipe on Friday for leftover turkey sandwiches!

So what's your Thanksgiving plan?


Read more!

Friday, November 21, 2008

Lucky Pho'

After my so-so pho experience at Kim's Vietnamese Chinese Restaurant, I was jonesing for a really good bowl of pho. Kirk (mmm-yoso) really enjoys the pho at Lucky Pho (read his review here), so I decided it was finally time to try it. Hey, Kirk hasn't steered me wrong yet (and a few hundred, maybe even thousands, of other San Diegans). With my friend, L, in tow, we headed over for lunch last week.

I've shopped at Lucky Seafood Supermarket many times but never eaten in the adjoining restaurant. And it dawned on me that I rarely eat at any "adjoining" type of establishments. Most likely some subconcious idiosyncrasy I got from my mom (I have a few of those!). She believed the food to be subpar from a "real" restaurant. Why? I never bothered to ask. But I had no trepedations about trying Lucky Pho. As a matter of fact, L and I were quite eager.

The restaurant was clean, less than half full when we got there around 11:15 am. We were greeted by a pleasant young man who escorted us to our table and gave us menus. L decided on a bowl of rare steak and medium flank and me the rare steak and tendon, our modus operandi. Shortly after, our bowls came. We noticed right off what Kirk described as a beefy broth. I immediately took a sip and sighed a happy "ahhhhhh." L agreed that this was the best broth that we've had. Rich, beefy, good depth, and nicely seasoned. It was so good, I didn't add anything else to it so I can enjoy all its richness as is.


This is my bowl. You can still see a bit of rare in one of the pieces, and the tendons were incredibly good. When I first picked up a piece of steak, I was a bit worried it might be tough because it was thicker than those in other pho places. But was I wrong. These steak and flank were the most tender we've had. And there was lots of it.

Okay, so all the add-ins are great. Moment of truth -- the noodles. After breaking it apart (the typical lump of noodles), I had my first bite. Ahhh, al dente, cooked just right. It had good pull just like Kirk described. Wonderful! Exactly what I was craving. L and I kept making "mmm-mmm-mmm" sounds as we finished our bowls. There was no doubt that these were the best bowls of pho we've had. As a matter of fact, we enjoyed it so much, we're going back today.

Thanks, Kirk, as usual.

Lucky Pho (next to Lucky Seafood Supermarket)
9326 Mira Mesa Blvd.
San Diego, CA 92126
(858) 586-7979
Hours: Mon-Sun. 7:00 a.m. - 10:00 p.m.

Have a wonderful weekend everyone! Now go and eat well.


Read more!

Sunday, November 16, 2008

Red Velvet Cake


I have a couple of friends who love red velvet cake. They get all giddy just at the mention of it. After all the drooling stopped, they asked (insisted was more like it) if I would make one with cream cheese frosting. I've never made it before so once again, I was on the hunt for a good recipe. I settled on Emeril Lagasse's "Sylvia" recipe because I wanted a butter recipe and not a traditional shortening recipe. I just prefer butter cakes.

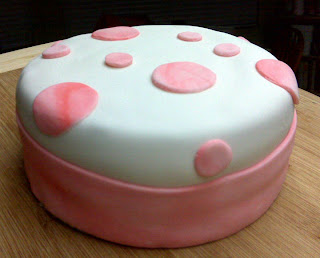
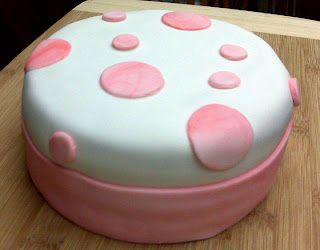
I also took this opportunity to try a homemade marshmallow fondant (MMF) recipe. Why not? Could be great, could be disastrous. I was up to the challenge because I too like to live dangerously! My plan, 2 smaller cakes, one with cream cheese frosting and the other one with buttercream and fondant.

The MMF cake turned out pretty good for my first fondant cake ever. I used only a touch of a red gel color, trying to achieve a pink marble look on the band and the dots. The taste of the MMF is quite sweet but it was good, certainly better than some premade fondants out there (that Wilton stuff tastes awful!). With the MMF being so sweet, I probably could have even gone thinner on the rolling. Next time.

Here's anther picture of the buttercream and fondant version.


Here is the cream cheese version and you can see how red it is inside. I think if I used 2 oz, the red would have been deeper.

Between the two, I liked the buttercream best. The Mister liked the cream cheese. I think I would have liked it better with my own cream cheese frosting recipe, but next time. Friends split down the middle as to which they liked best.

Here's the recipe for the cream cheese version.

Cake Ingredients:
2 1/2 cups cake flour
2 teaspoons cocoa powder (Dutch processed recommended)
1 teaspoon baking soda
1 teaspoon baking powder
1 teaspoon salt
1 1/2 cups sugar
1/2 cup (1 stick) unsalted butter, softened
2 large eggs
1 cup buttermilk
1 1/2 - 2 ounces red food coloring
1 teaspoon distilled white vinegar
1 teaspoon vanilla extract

Frosting Ingredients:
1 (8 oz) package cream cheese, softened
1/2 cup (1 stick) unsalted butter, softened (I prefer LAND O LAKES)
2 cups confectioners' sugar, sifted
1 teaspoon vanilla extract

Preheat the oven to 350 degrees F.

Grease and flour two 9-inch cake pans. I added parchment paper to the bottom of the pan and greased with butter. To avoid white powdery look on the finished cake, I used cocoa powder to dust the pans instead. Worked great.

In a medium bowl, sift together flour, cocoa, baking soda, baking powder, and salt. Set aside.

In a large bowl, on medium-high speed cream together sugar and butter, about 2 minutes. Beat in eggs, 1 at a time. Reduce speed and alternatively beat in the flour mixture and buttermilk (1/3 flour, 1/2 buttermilk, 1/3 flour, 1/2 butter milk, 1/3 flour). Scrape down sides of bowl as needed. Add food coloring and vinegar, mix well. Beat in vanilla.

Divide the batter evenly in the pans. Bake for 20 to 30 minutes or until a wooden toothpick inserted into the center comes out clean. Check it early because you don't want the cakes to over bake. That would lead to dry cakes and not very tasty.

Cool the cakes in the pans on a cooling rack for 10 minutes. Turn out the cakes onto the rack to complete cooling. While the cakes are cooling, prepare the frosting.

For the Frosting:

In a large bowl, combine the cream cheese and butter. Beat in confectioners' sugar until fluffy. Beat in vanilla. Use as the cake filling and frosting if desired.

Once the cakes have completely cooled (about 1 hour or so), fill and frost.

I crumb-coated both cakes and let sit in the refrigerator for 20 minutes. I should have let them sit a little longer. By the time I got to the sides, I was struggling a bit with crumbs. But nothing a thick layer of frosting won't cover up!

Have a terrific week. And if you haven't started planning your Thanksgiving dinner yet, maybe I can put the bug in your ear about brining your turkey. Me? I've talked the Mister out of a turducken and we're going to deep fry the turkey this year. Yikes!

Now go and eat well.


Read more!

Thursday, November 13, 2008

Spicy Extra Crunchy Fried Chicken

For the past I don't know how many years, I've been searching on-and-off for a fool-proof fried chicken recipe. What I am after is a flavorful (spicy actually), juicy (white and dark meat), crunchy, fairly simple frying recipe. Not too much to ask for, right? Apparently it is. I've tried several recipes and none, so far, has made my toes wiggle. (Your toes wiggle when you eat??) Ha, yeah. That's the latest phrase at the barefoot home. I was eating one of my vanilla-vanilla cupcakes the other day (after a long and stressful work day) and I mumbled on the last bite, "this is so good, it makes my toes wiggle!" And so thus a new measure of good eats has began.

So--I've got chicken fingers and fish & chips recipes that I really like, even getting the Korean fried chicken wings recipe down (which reminds me I need to do an updated post on that recipe). But the perfect fried chicken still eluded me. Until now.

A couple of weeks ago, I was watching an episode of Cook's Country and apparently, they were after the same things as me. How fortuitous for me! By the end of the show, I was so tickled with their method, I started planning on how to make it spicy. I went online to Cook's Country and to my surprise, they had a "spicy" version of their extra crunchy fried chicken! The cooking gods must have been smiling on me that day!

Due to copyright, blah blah blah, you'll need to go to Cook's Country website to get their recipe. You'll need to register (for free) which will give you access to this season's episodes and recipes. But do it before the next season starts or else you'll have to pay for them. To sum up, the chicken parts are brined in buttermilk and table salt for 1 hour for a juicy chicken. The flour was mixed with 6 tablespoon of buttermilk, so the flour becomes lumpy (kind of what the flour looks like at the end of dredging a batch). The chicken pieces are dredged, patting down the flour lumps onto the chicken pieces, then fried starting at 375 degrees F oil temperature, with the lid on. That last part was a bit of a surprise when I first heard it but it makes sense. The oil will drop to about 315 degrees and will stay there for the remainder of the fry time. This will help create even browning.

I followed the recipe exactly because I wanted a good foundation to start. Here are the results (sorry the picture was a little blurry).


You can see how crunchy the outside is. I could tell (hear) I achieved the crunchiness goal when the Mister bit into a drumstick. But was it juicy? The chicken was very juicy, even the breasts (although they were creeping up to the dry side, but a little less fry time would fix that). Okay, but what about the taste? If was very flavorful, best fried chicken I've made to date. The cayenne pepper gave it a nice little kick.


Here it is plated up with a side of All-American Potato Salad. BTW, we didn't care for the potato salad. As an afterthought, I should have cut into one of the pieces and taken a picture to show just how juicy the chicken was.

On a side note, I am lactose intolerant and seem to have a harder time digesting buttermilk, even with lactase pills. My plan is to try brining the chicken in milk and salt (possibly even just a water salt brine), and then using whole milk for the flour crumbles. I'm hoping it'll work just as nice with the milk substitute not only for digestive reasons but milk is something I always have on hand. Good for last minute meal decisions!

Hope y'all have a wonderful weekend. Now go and eat well.


Read more!

Kim's Vietnamese & Chinese Restaurant

I finally met up with some friends yesterday for lunch. We ended up at Kim's Vietnamese & Chinese Restaurant in Encinitas but to tell the truth, I was a bit reluctant because of some of the reviews I've read. But I was willing to try due to the "high" recommendation of Kim's pho from one of my friends.

It was a bit of a haul from where I work but luckily, I had a bit of time. I got there around 11:30 am and there was only 1 occupied table. One of my friend, the one who recommended the place, got there just as I did. We chatted and caught up while we waited for the others. Once everyone showed up, it was clear we were all there for pho, well, because of the recommendation. Everyone had the beef pho but I decided on the beef, tendon and tripe pho just to be different.

Not too long after, our pho came out. Other than the difference between the size of a regular and large order, all the contents looked the same. The tripe and tendon in mine were buried beneath the noodles. Sorry the picture is so terrible but we were sitting in the back of the restaurant, which was very dark, and I had to resort to my Blackberry camera with flash. But that table cloth really is pink. As a matter of fact, the whole restaurant is rather pink.


But back to the pho. The tripe was decent but the tendons were tough and hard on the tooth (crunchy), not very flavorful. Our "recommender" was going on about how great the broth was but I've had better. The broth had some spiciness to it that I couldn't put my finger on. But overall, it lacked depth and "beefiness" that I like. One of the eaters gave it a 7.5 out of 10. He thought the broth had good flavor, vegetables were fresh, but thought the beef wasn't as tender as he would like. I agree with the beef. But there was a decent amount of it. Another eater gave the pho 4.5 out of 5! Guess I'm the odd duck out, hehe. His only complaint was that he wished the broth was hotter. Another thing he noticed was that the after taste of pho didn't stay with him the rest of the day.

The side vegetables were the typical, which none of us really touched. I didn't see if there was saw tooth leaves because I was too busy (and hungry). There was a whole lotta cilantro and green onions, a bit too much for my liking. You can see some of the stalks I fished out on the side of the plate. This actually would have been a decent bowl of pho if the noodles weren't a bit overcooked and slightly mushy. But I was the only one who thought the noodles were a bit overcooked. I prefer my noodles a bit al dente with a bit of "tooth" to it. What can I say?

Although the "regular" bowl is bigger than a typical small bowl at other pho shops, at almost $10 (what a large bowl costs elsewhere), I think I'll stick to my usual haunts.

Since none of us had anything else, I can't comment on how good any of the other dishes are. But the menu is very extensive and I'm sure there's got to be at least 1 dish that I would find appealing. But I certainly wouldn't go out of my way to drive all the way back just to find out.

Kim's Vietnamese & Chinese Restaurant
745 S Coast Hwy 101#J
103Encinitas, CA 92023
(760) 942-4816

Postscript: One thing about pho that I've learned over the years is that every pho joint I've been to have good and off days. I've been to Pho Hoa Cali many times at 2 locations, having good and not-as-good meals. Same goes for Bolsa, Pho Ca Dao and a few other places. I haven't figured out why it's good 1 day and not another but the lesson I learned is to pick the places where I've had the most consistent "good" meals. And then throw in a few new places here and there. And with that not-so-mind-boggling insight, now go and eat well.


Read more!

Tuesday, November 11, 2008

Happy Veterans Day

I've mentioned the history of Veteran's day here. So for this year's Veterans Day, I thought I'd go a different route. Just a few things we learned as kids growing up in this country, but so little opportunity (at least for most of us) as adults, below are the words to The Pledge of Allegiance, The Star-Spangled Banner, and God Bless America. We can always use a little refresher. And don't forget to thank and hug a Veteran today.


The Pledge of Allegiance

I pledge allegiance to the Flag
of the United States of America,
and to the Republic for which it stands:
one Nation under God, indivisible,
With Liberty and Justice for all.


The Star-Spangled Banner
Composed by Francis Scott Key,
"In Defense of Fort McHenry" in September 1814.
Congress proclaimed it the U.S. National Anthem in 1931


Oh, say, can you see, by the dawn's early light,
What so proudly we hail'd at the twilight's last gleaming
Whose broad stripes and bright stars, thro' the perilous fight,
O'er the ramparts we watch'd, were so gallantly streaming
And the rockets' red glare, the bombs bursting in air,
Gave proof thro' the night that our flag was still there.
O say, does that star-spangled banner yet wave
O'er the land of the free and the home of the brave!


God Bless America
Words and music by Irving Berlin©
Copyright 1938, 1939 by Irving Berlin©
Copyright Renewed 1965, 1966 by Irving Berlin©
Copyright Assigned to the Trustees of the God Bless America Fund
International Copyright Secured.

"While the storm clouds gather far across the sea,
Let us swear allegiance to a land that's free,
Let us all be grateful for a land so fair,
As we raise our voices in a solemn prayer. "
God Bless America,
Land that I love.
Stand beside her,
and guide her
Thru the night with a light from above.
From the mountains,
to the prairies,
To the oceans,
white with foam
God bless America,
My home sweet home.


Read more!

Saturday, November 8, 2008

Spicy Beef Asian Noodles

I'm not exactly sure what to call this dish because it's kind of a butchered version of a dan dan mein (noodles) recipe that I found somewhere that I can't remember (ah, aging, ain't it grand?). That recipe isn't what I would consider classic Sichuan style but it's an acceptable version. But because I've substituted several of the ingredients, I don't feel calling this recipe dan dan mian completely true. So let's just stay with spicy beef noodles.


You can use any kind of Asian noodles, I just so happen to have some fresh packaged Chinese noodles on hand. I do like the thicker noodles in this dish. You can also substitute the sesame paste with peanut butter but I like the taste with sesame paste. The recipe below is for 1 person serving. I double everything when making it for the Mister and me. Also, we like it pretty hot so I usually add more of the chili sauce (the one with the rooster on front) than what the recipe calls for. Adjust heat to your liking.

Ingredients:
6 oz of Asian style noodles

Broth:
1 tablespoon sesame paste (or peanut butter)
1 tablespoon soy sauce
1/4 teaspoon salt
1 1/2 cups chicken broth
1/4 tsp white or rice vinegar
1/2 tsp chili sauce (can substitute with chili oil)

Topping:
6 oz of ground beef (you can use ground pork but you'll have to call it Spicy Pork Noodles!)
2 tablespoon chicken broth or water
1 tablespoon soy sauce
1 tablespoon Szechuan soybean paste (or substitute with black bean paste)
1 teaspoon chopped garlic
1 teaspoon chopped green onion
1 teaspoon salad oil (I use canola oil)
1/2 teaspoon chili sauce (or chili oil)
1 teaspoon cornstarch and cold water, mixed

Directions:
In a wok or pan, heat oil on medium-high and cook meat until done. Add all the topping ingredients, stir and cook for about 1 minute. Add cornstarch slurry and cook for another minute to thicken.

Cook noodles according to package instructions.

In medium pot, add all the broth ingredients and bring to boil. Place the broth in a serving bowl. Add noodles. Add toppings to noodles. Serve hot.

Chopped Szechuan pickles and/or dried small shrimp, and chopped peanuts can also be added on top for an additional twist. Also a quick note that the taste will vary a bit between the Szechuan soybean paste and the black bean paste. The Szechuan soybean paste is on the sweeter side, sometimes used in zha jiang mein. I actually only use miso paste for my version (actually my Mom's version) of zha jiang mein. But that's another post.

Have a wonderful weekend! Now go and eat well.


Read more!

Wednesday, November 5, 2008

Vanilla-Vanilla Cupcakes


I've really become quite fond of making cupcakes. Well, and eating them too. They are quick to make and easy to eat. A cupcake a day keeps all your blues away (but not your waistline). My favorite is a yellow cupcake with vanilla buttercream frosting, which is also my basic (foundation) yellow cupcake and frosting recipe. The recipes can be modified to make chocolate or several other types of flavors.

I dubed this my Vanilla-Vanilla Cupcakes (or Vanilla Squared Cupcakes) and used vanilla sugar in the batter. Vanilla sugar is easy to make if you have a vanilla bean. Combine the vanilla bean and sugar in a jar with a lid. Close lid and let sit for several days. Sugar will smell and taste (a bit) like vanilla. I try to keep some on hand for baking.

I kind of switch back and forth in the type of flour that I use, depending on the type of cake I want. If you prefer a slightly crumblier type of cake, use only all-purpose flour. If you like more of a cakier, pound cake like texture, substitute 1/2 cup of the flour with cake flour. The recipe below is for the latter. I really enjoy pound cake and find that this vanilla frosting goes very well with the cake. The vanilla frosting is sweet but not overly sweet like many of the ones out there. I have yet to try the recipe with all cake flour.

Makes 12 cupcakes

Cupcake Ingredients:
1 cup all-purpose flour
1/2 cup cake flour
1 teaspoon baking powder
1/4 teaspoon salt
1 cup sugar (vanilla sugar if you have it)
1 stick (1/2 cup) of unsalted butter, softened (I like to use LAND O LAKES)
2 eggs
1 teaspoon real vanilla extract
1/2 cup milk (I use whole milk)

Vanilla Frosting:
1 stick (1/2 cup) of unsalted butter, softened (I like to use LAND O LAKES)
2 1/2 cups confectioners' sugar, sifted
1/2 teaspoon real vanilla extract
1 pinch of table salt

Heat oven to 350 degrees F. Note that I actually use 325 degrees because my muffin pan is the non-stick, darker kind. By turning down the oven temp and "maybe" extending the cooking time (just a wee bit) will prevent the cupcakes from getting a little too dark on the bottom and sides. Keep them light and tender!

In a bowl, whisk together flour, baking powder, and salt.

Beat sugar and butter on medium speed until creamy, scraping bowl occasionally to ensure thorough mixing. Add eggs, 1 at a time, beating well after each one. Add vanilla. Reduce speed to slow and alternately add flour mixture and then the milk, mixing after each addition. I add 1/3 of the flour mixture and mix, followed by half of the milk and mix, then anther 1/3 flour mixture and mix, then the remaining milk and mix, and finally the remaining flour mixture and mix just until everything is incorporated. (Did you get all that?) Don't over beat the batter or the cupcakes can get tough. Scraping down the sides of bowl down as needed will help. Remember, keep them light and tender!

Divide batter into prepared muffin cups, filling about 3/4th full. Bake until the cupcakes are lightly golden on top and a toothpick inserted into the center of a cupcake comes out clean. This will be about 18-20 minutes. If baking at the lower temperature, I still recommend checking the cupcakes around 18 minutes but it usually takes 20 minutes in my oven in my pan.

Transfer the pan to a wire rack and let cool for 5 minutes. Then transfer the cupcakes to the rack and cool completely. You can use a butter knife to help get the cupcakes out of the pan. Cooling can take anywhere from 30-60 minutes.

Prepare the frosting while the cupcakes are cooling. Put the butter in a bowl and beat on medium-high speed until the butter is creamy and pale in color. This may take up to 2 minutes. Reduce the speed to medium and add the sugar, 1/2 cup at a time. Mix well after each addition, scraping the bowl as needed. Add vanilla and salt. Increase mixer speed to medium-high and beat until smooth, for about 1 minute.

Frost the cupcakes. I like to use an open flower tip to create various decorations just because I suck at frosting with a small offset spatula. I also don't mind too much on cleaning. I'm still practicing with other type of tips, too, just for the fun of it.

Frosted cupcakes can be kept in the refrigerator in an airtight container for up to 3 days.

Now go and eat well.


Read more!

Monday, November 3, 2008

French Bread (Baguettes)

Hope everyone had a great Halloween. To counter all that candy and chocolate, here's another bread recipe that I made this weekend. It's a simple French Bread recipe from Betsy Oppenneer's The Bread Book. Oppenneer called it French "style" because authentic French bread is made from French-milled flour that creates a lighter loaf. Whatever because these are light enough for me.


See all those holes? Pretty light. And the crust was just crusty enough but not as thick or hard on a tooth like rustic breads can be. Using a steam pan really does the trick to develop a beautiful crust and easy enough for a beginner home baker like me.


I made 4 loaves of baguettes on Saturday and there's only a half loaf left this morning. We had them plain with butter, toasted with butter, for breakfast with over easy eggs, toasted with Chopped Liver, toasted and grounded to make bread crumbs for meatloaf, and toasted for leftover meatloaf sandwiches. Mmm-mmm-mmm.

As with most basic yeast bread recipes, this one took time, a little more time than some. This particular recipe used cool water and longer than usual rising time to build more flavor and the airy texture that a good french loaf should have.

You might think 4 loaves is a lot but these are smaller than those you find at stores, only about 14" long each. But they keep well wrapped up and retoasts nicely.

I used a baguette pan for 3 of the loaves (because it only holds 3 loaves) and then 1 on a baking sheet. To my surprise, the one on the baking sheet crusted up better than the baguette pan's. The top crusts were pretty much the same, but it was the bottom crusts where the difference was. The pan produced almost a par-baked bottom. I think the reason is because the bottom of the pan is perforated and sat right above the steam pan. I ended up rebaking the loaves upside down for another 10 minutes on the baking sheet and it crisped up nicely. Kind of like the par-baked breads from the store, except that the loaves were completed cooked through and are much lighter and airy. And IMHO, much better tasting. Now I'm completely spoiled.

The other difference in using the baguette pan was that the loaves proofed into very nice rounder loaves, like what store bought baguettes looked. I liked the looks of the loaves but tastes were the same as the one baked on the baking sheet.

I think the next time I make these (and I will soon), I'll still use the baguette pan but will also add my pizza stone on the bottom to see if that helps with the bottom crust. I also think I will try preheating the oven at 450 degrees F instead of the recipe's 425 degrees. From everything that I've read, a higher temperature when first inserting the loaves is key to rise and crust formation.
I decided to use the stand mixer to do the initial mixing since that is much easier on the arm. I sort of followed Oppenneer's recommendations and I think I finally have it figured out. The recipe below is for initial mixing with a stand mixer. If you want to do this manually, you might want to read what I did with the basic white bread recipe.

Ingredients:
1 package (1/4 oz) or 1 scant Tbsp active dry yeast
1/4 cup warm water (105-115 degrees F)
2 cups cool water (45-55 degrees F)
5 1/2 - 6 1/2 cups unbleached all-purpose flour
2 tsp salt
Cornmeal (if using baguette loaf pan)

Using a large bowl (or stand mixer bowl), soften the yeast in the warm water.

Add salt to bowl. Use the paddle attachment for this step (NOT the dough hook). On medium speed (#4), add 3 1/2 cups of the flour, about 1/4 to 1/2 cup at a time to prevent flour from getting everywhere. After the flour is incorporated, beat for 2 minutes. The dough will still be fairly sticky at this point but it's ready for kneading.

On a well-floured work surface, turn out the dough, using a dough scraper if needed. Flour your hands and the dough surface really well and start kneading. Add a little bit of flour as needed to prevent sticking, for 8 to 10 minutes. I ended up adding almost another cup of flour but how much will depend on each particular situation.

Use a dough scraper to scrape the dough if it sticks. The dough is ready when it's smooth, elastic, and you see blisters (small bubbles beneath the surface) on the surface.

Put the dough in an oiled bowl and turn to coat the entire ball. Cover with a tightly woven kitchen towel or cover with plastic. Let rise in a cool place (about 60 degrees F) for about 3 hours or until triple in size. Since the house was on the comfortable side (about 73 degrees) that morning, I had to find a place where it was a bit cooler, I chose a spot on the floor tile, in the corner of the living room.

I checked on it after an hour and it seems to be rising a little bit faster than it suppose to. So I put the bowl on the top shelf of the refrigerator for 30 minutes to slow things down a bit. I then placed the bowl back in the corner on the tile floor for another hour. By then, it looked like it was ready to flow out of the bowl so I put the bowl back into the fridge for the remaining 30 minutes.
Prepare the baguette pans by oiling and sprinkling with corn meal. If using a baking sheet, oil the baking sheet, no corn meal.

Turn the dough out on a lightly oiled work surface. Divide the dough into quarters. Roll out each piece into an 8 x 10 oval and then fold it lengthwise in thirds. Flour the rolling pin to prevent sticking. Use the side of your hand to make a lengthwise crease down the center. Fold it in half and pinch the seams closed. Make sure you pinch the seams hard enough to keep it closed. Taper the ends a bit. This and the folding will help develop the skin on the dough that is crucial for good final crust formation.

Starting in the middle, use flat palms to gently roll the dough back and forth to form a even 14" cylinder. Try to make the cylinder about the same thickness its entire length. But if it's a bit off, don't worry about it. Close is good enough.

Repeat this with the remaining 3 pieces of dough. Put the loaves seam side down on the prepared pan or baking sheet. Cover with a towel and let rise at room temperature for 40 minutes.

While the loaves are in their final proofing, preheat oven to 450 degrees F. Place a shallow pan on the lower shelf of the oven. I used the bottom of an old roasting pan.

Shortly before baking, make diagonal slashes in the loaves, about 2" apart and about 1/4" deep. I like my slashes to be just a bit deeper, about 1/2". I think it's prettier that way. Use a sharp serrated knife.

Lightly (very lightly) brush the top of the loaves with cold water and let sit uncovered for 5 minutes. Brush with cold water again just before putting into the oven.

Heat up 2 cups of water, doesn't need to be boiling, just hot.

Place the loaves into the oven. Carefully and gently (but quickly) pour the hot water into the preheated pan on the bottom shelf (see warning below about steam). Be careful of the hot steam, keep your head back. Close the oven door immediately to trap the steam. Bake for 18-20 minutes or until they pull slightly from the pan and sound hollow when tapped on the bottom.
The internal temperature should be 200 degrees F.

Remove from pans immediately and cool on racks.

WARNING: I have read on a couple of bread sites that some home ovens have problems when using the steam method. Apparently some of the newer electric ovens are shutting off due to the extra steam. So please read your owner manuals and/or contact your oven manufacturer if you have any doubts before trying this or voiding your warranty. I have a very old basic oven with no electronic brain to screw up and found no ill-effect of the steam.

That's it. If this is too many loaves for you to eat, share it with friends and family. Receiving home baked items made with care and love is one of the nicest things in the world, IMO. Now go and eat well.


Read more!