Monday, September 29, 2008

Pumpkin Carving

Have you started planning your costumes, parties and/or pumpkin carving? Heck, Halloween candy started showing up at stores the day after Labor Day, so what are you waiting for? Halloween is only a month away. No time to lose.

Halloween is one of my favorite holidays. I've loved carving pumpkins ever since I was a wee little lass, saving my lunch money to buy the biggest pumpkin I can find. Now that I don't have to scrounge for lunch money, I often splurge on multiple pumpkins to carve each year (4 was the most as my fingers cried in agony the next day).

For many years, I relied on Pumpkin Masters' templates and tools, as well as making my own templates. I've collected most of their pattern booklets up to about 3 years ago when I found Zombie Pumpkins! I still think that Pumpkin Masters are good for starters, especially kids. Also, they rate the templates easy to hard. The pattern booklets can also be found in many chain stores and local pumpkin patches.

But if you are a pumpkin carving enthusiast, you'll really enjoy the Zombie Pumpkins! patterns all created by Ryan, the Patch Master himself (disclaimer: I have no affiliation to nor do I receive any incentive from Zombie Pumpkins!). You can download a few freebies to try. The new Skrull pattern looks awesome and I would probably rate that for not-so beginner to an intermediate carver (some detailed cuts involved). But if you want access to all of Ryan's creations, you can choose from a variety of memberships (info here). From all the patterns you get, I think the membership fee is a graveyard bargain!

Once you get the hang of carving beyond the triangle eyes and jagged teeth jack-o-lanterns, you find that your household knife won't give you some of the ease and precision cutting you'll need. I highly recommend purchasing some kind of carving tool set to make it faster and more enjoyable. I have a wood carving set that I purchased years ago but there are better sets now (like the one on Zombie Pumpkins!) more tailored for pumpkin carving. This year, I purchased the pumpkin gutter and can't wait to use it! Gutting the pumpkin, IMHO, is the most tedious and annoying part. So with the new gadget, and with some help from the Mister, I should be able to breeze through the annoying part quickly. Hey, it might even make gutting the pumpkins fun.

You can find some very valuable information on the Zombie Pumpkins! forum. You don't need to pay to read the forum posts but you will need register if you want to post. There are also other sites you will find if you google pumpkin carving. But most sites will charge you for downloading/printing patterns.

Here are some of the pumpkins we've carved in the past. Most of these were fairly easy. The ghost (Oogie Boogie 2) on the left in the last picture was the one I chose for the Mister to do last year as his first pumpkin. He enjoyed it (minus the gutting part) and will be carving another one this year! I have a few in mind but you'll just have to wait and see which ones.


Read more!

Saturday, September 27, 2008

Carrot Cupcakes with Vanilla Cream Cheese Frosting

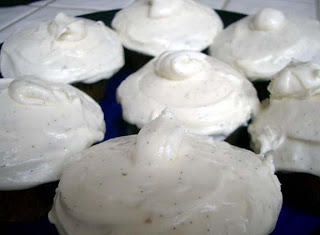
I recently came across a carrot cupcake recipe on the William Sonoma site that didn't have the traditional ingredients in a typical carrot cake (no raisins, cinnamon, other spices, or nuts). Since I'm not a big fan of nuts in my baked goods (much to the Mister's chagrin), I thought I'd give the cupcakes a whirl. The recipe is very simple and comes together quickly. Although I didn't have any mascarpone on hand, I decided to make a vanilla cream cheese frosting since I have really good vanilla extract and a huge stash of wonderful Tahitian vanilla beans. What's a carrot cake without cream cheese frosting, right?

Like I said, this recipe comes together quickly. It took longer to wait for the cupcakes to cool than to make them. I followed the recipe with one minor adjustment. I only added 1 tablespoon of grated orange zest. Two tablespoons seemed quite a lot and I'm glad I adjusted it. The cupcakes were very moist and tender.

While the cupcakes are cooling, you can prepare the cream cheese frosting. This will make a bit more than what is needed for the cupcakes.

Vanilla Cream Cheese Frosting
1/2 cup (1 stick) unsalted butter, room temperature
4 ounces cream cheese
1/2 teaspoon pure vanilla extract
2 cups confectioners' sugar
1/2 vanilla bean, scraped


Directions:
Place butter and cream cheese in the bowl and beat with electric mixer until creamy. On low speed, slowly beat while adding vanilla extract, seeds from vanilla bean, and confectioners' sugar. Continue beating until smooth and creamy, about 3 minutes. Extra frosting can be kept in an air tight container in the refrigerator for up to 1 month. (BTW, this frosting makes a nice cake filling, too.)

Spoon a large dollop on top of cooled cupcake and spread with a small offset spatula. And voila, yummy carrot cupcakes. I like the look of the vanilla bean seeds in the frosting.


If the frosting is getting too soft, put the cupcakes in the refrigerator for about 10 minutes to firm a bit. I put a few in the refrigerator overnight and had them the next morning with coffee. The cupcakes lost some of its tenderness. I recommend storing them in an airtight container but just note that the cream cheese filling will be on the softer side. Overall, these are nice (and quick) little treats for carrot cake lovers. But if you're more of a traditionalist, I'm sure your favorite carrot cake recipe will do just as well in cupcake size.
Enjoy and have a wonderful weekend. Now go and eat well.


Read more!

Wednesday, September 24, 2008

Chicken Fingers - Revisited

Every now and then, I go back and reread some of the recipes I posted. I made chicken fingers again this past weekend and realized that somewhere along the line, I've started to lean towards deep frying the chicken fingers rather than pan frying. I'm still pan frying but I'm adding more oil that barely covers the fingers, almost deep frying. I found that this cooks the chicken wings quicker and more evenly.

I also discovered something interesting due to a brain fart and lack of timing. The chicken fingers were done before the fries were done, by 12 minutes! I was in a dilemma because I did not want soggy chicken fingers and since the fries were being baked, I couldn't tent foil the fingers in the oven. So I resorted to "refrying" (egad!) the fingers once the fries were done at the risk of them being too oily.

The oil temperature kept well in the Staub Dutch oven so it didn't take long to get the oil temperature back up to 350 degrees. But something in the back of my head (where all the useless information resides) told me to heat the oil a little higher for the second fry. Some Korean chicken wings place do this to get an extra crisp on the wings. So I let the temperature rise to around 365 degrees before test frying my first strip (better a soggy finger than a burnt finger, I guess). It only took about 30 seconds in the oil until the outside crisped up. So I proceeded to refry the rest of the chicken fingers. All in all, took only a few minutes to refry the whole batch.

To my surprise, the chicken fingers were not any oilier than the first fry and the crust stayed crunchy much longer. My guess is that the fingers had cooled down before going in the second time and were not in the oil long enough to soak up excess oil. Although I wouldn't go out of my way to do a second frying but it's nice to know that they can withstand a second "crisping."

Have a good hump day. Now go and eat well.


Read more!

Tuesday, September 23, 2008

It's Hockey Season 2008-2009!

Well, almost. The season officially starts on Satureday Oct. 4, less than 2 weeks away. The Buffalo Sabres' 1st game is Oct. 10 (woohoo!) against the Canadiens at home. And this year, the Sabres will be visiting the Anaheim Ducks again at Honda Center on Feb. 2, 2009. The Mister and I are still debating whether to shell out some dough for some decent seats or just stay at home and enjoy the game in HD. We'll see.

Cool news from last week. The Sabres revealed their 3rd jersey, which includes the retro Buffalo logo with some updated splash (way better than the weird lightening bolt x buffalo head whatever-you-call-that logo). The retro logo is my favorite of all the logos. I also like the lace ups on the front collar. Guess what I'll be putting on my Christmas wish list this year??

Can't wait for the season to start. Punch them in the face!!!! (Hockey! Hockey! Hockey!)


Read more!

Thursday, September 18, 2008

Easy Taco Bake

Inspired by Cathy's (mmm-yoso) Friday's $5 meals for two, I thought I'd share one of my go-to "cheap" meals. I usually have all the ingredients on hand, maybe with the exception of ground beef on some occasions. This recipe has 3 things going for it, cheap, can be a 1-pot recipe, and heats up well as a leftover, if there are any. This recipe easily feeds 2 people, possibly 3 with some sides.

If you want to make this as a 1-pot recipe, you'll need a Dutch oven or a pot that is oven safe up to 400 degrees F. If you rather use a baking dish, spray a 13x9-inch (~3-quart) baking dish with cooking spray before putting the meat mixture in.

Ingredients:
1 lb ground beef (your choice of fat content; you can also substitute in ground turkey or chicken)
1/2 cup diced onion
1 clove of garlic, minced
1 (14.5 oz) can stewed tomato (Del Monte Mexican Recipe recommended)
1 package of taco seasoning (Taco Bell recommended)
1 (6.5 oz) package cornbread mix (Betty Crocker Cornbread & Muffin mix recommended)


Preheat oven to 400 degrees F. In a Dutch oven or a heavy pot on medium heat, cook the onions and garlic until translucent, about 6 minutes. (If not making as a 1-pot recipe, then use any pan to cook the meat mixture.) Don't let the garlic burn. Add meat and cook until brown.

Add stewed tomatoes with juice. I typically like to puree the stewed tomatoes because I don't like the big chunks of tomatoes in the dish. You can coarsely chop them, too.

Add the taco seasoning and mix well. Cook until heated through. If using a baking dish, spray the dish with cooking spray, then transfer the meat mixture into the baking dish.


Prepare the cornbread mix according to package. Drop batter by spoonfuls over the meat mixture. Spread to cover. Don't worry if there are some bare spots since the mix will puff up and spread.
Put in oven and bake for 16-18 minutes. Just a note that if you are using a Dutch oven for baking, check the cornbread around 12 minutes since it tends to cook much faster. You might also need to turn the oven down to about 375 degrees. Let cool for 5 minutes before serving.

And here's the final product.

And here it is plated.

Of course you can bake the cornbread by itself and then serve it with the meat but the less pots I have to wash, the better! Now if you like a kick in your taco, add some taco sauce or even some chili pepper when cooking up the meat.

Sometimes I will put honey butter on top of the cornbread as soon as it comes out of the oven. I love honey butter on cornbread! Honey butter is easy to make. I mix 1 pound butter with 1/3 cup honey with a hand mixer until the honey is just incorporated into the butter. This will keep for a long time in the refrigerator in an airtight container.

Have a wonderful weekend. Now go and eat well.


Read more!

Sunday, September 14, 2008

Pesto Palmiers

About a week ago I made some sweet palmiers. Today is all about a savory palmier made with pesto using the other sheet of puff pastry. These make wonderful appetizers sure to impress. Techniques are similar to the sweet recipe and almost just as easy. The recipe includes homemade pesto but you can substitute with your favorite store bought pesto.

Pesto Ingredients:
1 cup basil leaves
1/4 cup pine nuts, toasted
1 tablespoon grated Parmesan cheese
1 garlic clove, minced
1-2 teaspoon olive oil

I toast the pine nuts in a dry pan or skillet over medium-low heat. Shake the pan frequently to ensure even browning. Be careful to babysit the pan because the pine nuts will burn quickly if you don't watch carefully. When the nuts are fragrant and browned, take the pan off the heat. Transfer the pine nuts to a plate to cool.

Combine all ingredients except cheese in a food processor and pulse until smooth. Don't add too much oil, just enough to combine all the ingredients into a smooth, thick paste. Put the pesto into a bowl and add Parmesan cheese. Combine and set aside.

Palmiers Ingredients:
1 sheet puff pastry, thawed
1/4 to 1/2 cup grated Parmesan cheese
Pesto
1 egg
1 tablespoon water

Preheat oven to 375 degrees.

Sprinkle grated cheese onto work surface. Roll out the puff pastry on top of the cheese. Spread the pesto on top of the pastry, within 1/2 inch of each side of the pastry. You might not need all of the pesto.


Fold the left and right edges of the puff pastry halfway to the center of the dough.


Fold the two halves together like a book.


Cut into 1/2 inch slices and place onto parchment-lined or Silpat/Exopat baking sheets. Whisk egg and water together and brush over the palmiers. Bake for 8 minutes or until golden. Flip and bake for an additional 6-8 minutes.


I find that the savory palmiers are best the day of baking and don't keep as well as the sweet ones. Crisp up in the oven on 375 degrees for about 6-8 minutes.

There's lots of other variations for savory palmiers. Sun-dried tomato pesto is also another good one since you can find ready made pesto at the store. Prosciutto spinach palmiers is another and works well with puff pastry as a palmier because of prosciutto's thinness (easy to roll and doesn't get soggy). Use chopped frozen spinach and make sure you squeeze all of the water out before putting them on the pastry sheet. For a little flare, add some goat cheese or brie before baking. Let your imagination run wild! Maybe not too wild but you get the idea.

Hope y'all enjoy the rest of the weekend. Now go and eat well.


Read more!

Saturday, September 13, 2008

Mars Petcare US Voluntary Recall of Dry Pet Food

Here we go again. Mars Petcare US announced today of a voluntary recall of products manufactured at its Everson, Pennsylvania facility. The pet food is being voluntarily recalled because of potential contamination with Salmonella serotype Schwarzengrund. This voluntary recall only affects the United States. You can read all the details here. If you feed one of the brands listed, please, please, please switch to a better brand of dog food, permanently.


Read more!

Friday, September 12, 2008

Happy Moon Festival

This year's Moon Festival is Sept. 14 (Sept. 13 in the U.S.). The Moon Festival is also known as the Mid-autumn Festival. If you've been to an Asian market in the past couple of weeks, you probably noticed all the various moon cakes for sale. The traditional red bean with egg yolk has always been my favorite. But it's been years since I've had one.

If you happened to pick some moon cakes, turn off all your lights inside and out, light a lantern, go outside, and eat one of the cakes under the full moon. Even better, share it with someone you love. Wear something red for good luck, too.

If you want to get more festive and happen to live near a Chinatown, check your local newspaper or check here to see what kind of Mid-autumn Festival is going on in your town. Here is the link to L.A. Chinatown's Festival. Enjoy and eat well!


Read more!

Thursday, September 11, 2008

Sunday, September 7, 2008

Petite Palmiers

Palmiers, also known as Elephant Ears, can be sweet or savory. Although they may look fancy and quite elegant (especially as an appetizer), they are very easy to make. That is, with a little help from store bought frozen puff pastry. This recipe for sweet petite palmiers is made from granulated sugar, cinnamon, and a tad of kosher salt. I've substituted vanilla sugar when not using cinnamon since the cinnamon has a tendency to mask the the vanilla. The recipe is for 1 sheet of frozen puff pastry. Just double everything if using both sheets.
You can also make a more decadent and buttery version by melting 1/2 stick of unsalted butter and brushing on the pastry sheet prior to sprinkling of sugar. Then brushing on the cut sides of the palmiers before baking.

Ingredients:
3/4 cup granulated sugar
1/2 teaspoon ground cinnamon
A pinch of kosher salt
1 sheet puff pastry, defrosted (recommended: Pepperidge Farm)
1/2 stick unsalted butter, melted (optional)

Instructions:
Preheat the oven to 425 degrees F.
I measure out the sugar and cinnamon into a small bowl. I add the pinch of kosher salt and mix well. Adjust cinnamon to taste.


Pour 1/2 of the sugar mixture on a flat surface, like a wooden board or marble, that is larger than the pastry sheet. Unfold the sheet of puff pastry onto the sugar. Here's where you want to brush on the melted butter with a pastry brush. Pour remaining 1/2 of the sugar mixture on top, spreading it evenly on the puff pastry. Try to get even covering of sugar. With a rolling pin, gently roll the pastry sheet to press the sugar into the puff pastry.
Fold the left and right sides toward the center.


Fold them again so the edges of the two folds meet exactly at the middle of the dough. The picture below shows the right edge folded in.


Then fold 1 half over the other half as though closing a book. This is what the ends will look like. (Note: there are several ways to fold palmiers, this just happens to be the one I used for this version.)


Slice the dough into 1/4" to 3/8" slices and place the slices, cut side up, on baking sheets lined with parchment paper or Silpat/Exopat. Brush on melted butter (optional). If you want extra caramelizing on the outside, you can dip the cut sides into more sugar before laying out on the baking sheets.


Bake the cookies for 8-10 minutes until caramelized and golden on the bottom. Turn with a spatula and bake another 3 to 5 minutes, until the other side is also caramelized. Be careful at this stage because once the sugar starts caramelizing, it can go from yummy to burnt rather quickly. I like mine to be on the lighter side since I find the puff pastry to be more delicate. Transfer to a baking rack to cool.

Yield: ~20 cookies


These can be kept in an airtight container for up to 4 days but they are the best the first day. What to do with the second sheet? How about some savory palmiers? Stayed tuned!

Hope everyone is having a wonderful weekend. Now go and eat well.


Read more!

Saturday, September 6, 2008

Coconut Cake Revisited

About 3 weeks ago, I made the "Ultimate" coconut cake using Robert Carter's recipe. I froze about 1/4 of the cake (cut into 2 very large slices) using a vacuum bag. I decided to open it this week to see how the cake faired. Here's a picture of the cake after thawing in the refrigerator overnight. The cake was a little compressed but looked pretty good overall.


The edges were a bit unsightly from the bag compression but slicing off just a hair on both sides made a more presentable cake. Here's what a slice looked like, not bad.


So how did it taste? After letting the slice warm up a bit but still slightly cool, it was still pretty good. The cake didn't taste as fresh before the freezing but definitely not stale. The cream cheese frosting and the custard filling still tasted exactly the day I made it. Still very very sweet and after only 4 bites, I went into sugar overload. Overall, the cake faired pretty well! I still have the other 1/8 slice in the freezer and will try that one in about 3 weeks, if I remember.


Read more!