Tuesday, March 24, 2009

Sweet Home Chicago Pizza (NY Style)

We enjoyed the Chicago-style Deep Dish pizza from Sweet Home Chicago Pizza (review here). But we also wanted to try their NY-style pizza, both of us fans of thin crust and all. I think read somewhere on Yelp that they had bought Coney Island's recipe when they purchased the place. And since Coney Island had some decent reviews when they were in business, we were looking forward to trying the NY-style.

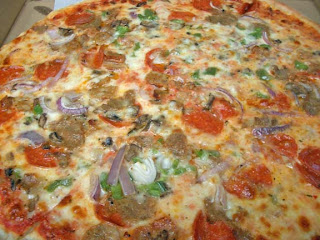
As last time, the person taking the order was very pleasant (according to The Mister). We decided to try the Coney Island Deluxe. 40 minutes later, pizza was here!


As you can see, there's lots of ingredients on the pizza. They used red onions rather than yellow onions, which is fine. The pizza was cut into large slices, good for folding. The sausage was decent and pepperoni is, well, pepperoni. What we were disappointed in was the crust and the sauce. The crust had a good pull and chewiness to it but was very bland, almost like cardboard. The sauce was quite salty and I really didn't care for it at all. Bottom line, neither of us liked the pizza.

I had told The Mister my skepticism about a pizza joint that makes deep dish AND NY-style pizza. Is it possible we found a restaurant can do both types well? Unfortunately, if I was judging SHCP by the Coney Island Deluxe, the answer would have to be no. I think we're going to stay with the deep dish.

Sweet Home Chicago Pizza
14034 Poway Road,
Poway, CA 92064
858-668-3215

Hours:
Mon-Thu. 11:00 a.m. - 9:00 p.m.
Fri-Sat. 11:00 a.m. - 10:00 p.m.
Sun. 11:00 a.m. - 9:00 p.m.


Read more!

Monday, March 23, 2009

Brownie #2

Encouraged by the taste of Brownie #1, Brownie #2 was focused on the texture more so than the flavor. My original thought was just to add some leavening (i.e., baking powder) which I believe would solve the height issue and give the texture a bit more...fluff without being cakey. On the morning of testing, I decide to also adjust for volume also since I was going to use the Baker's Edge pan.

I started out with 2 tablespoon of water but after mixing everything together, the batter seemed a little dry, so I added an extra tablespoon of water. Hard to say whether it needed it or not but the batter was a little easier to spread. I also changed the white sugar to dark brown sugar ratio since brown sugar is suppose to help with the chewiness.

Since I wanted to increase the batter amount, I had to adjust the egg content to compensate for the increase in flour. I used a Cook's Illustrated trick for chewiness by only adding egg white. This should also keep the brownie from getting cakey (ick). I think the adjustments were spot on as to what I thought they would produce. Taste test results are after the recipe.

Brownie #2

Ingredients:
1 whole egg + 1 egg white (large eggs)
1 tsp vanilla
1 1/2 C sugar
1/2 C dark brown sugar
1/4 oil (Canola)
1 stick melted butter (1/2 cup)
3 Tbsp water
1 1/2 C unbleached AP flour
3/4 C dutch-processed cocoa powder (Callebaut)
1/2 tsp table salt
1/2 tsp baking powder

Preheat oven at 350°F oven (using Baker’s Edge Brownie Pan pictured below).

In a medium bowl, mix eggs and vanilla (hand mixed with a wooden spoon). Add sugars and mix. Add oil, butter, water and mix well. Don't worry if there is a bit of separation of the melted butter and/or oil on top. It'll all get blended together.

In separate large bowl, sift flour, cocoa pwder, baking powder and salt together. I sifted this time to help with the height. I think you can get away without sifting. You can also sift all the dry ingredients directly into the wet ingredient bowl (saves on clean-up). Add the wet ingredients to the dry and mix just until incorporated.

Lightly sprayed Baker’s Edge (or an 8" x 8" pan) with oil. Spread mix into pan. Bake for 25-30 minutes until toothpick inserted into center comes out with light crumbs. Cool completely in pan and cut into squares. Here's what it looked liked in the Baker's Edge pan.


For the taste test of Brownie #2, I had 2 extra volunteers. So there will be 2 additional Brownie Guinea Pigs to this taste test panel (hehe).

CAB: Chocolate taste is still good, but not as intense as Brownie 1 (expected since the flour ratio is a bit higher). The baking powder really gave a good rise and improved the texture with a little bit of fluffiness, almost with slight fudgy mouth feel on the inside. Sides were chewy, but delicate, not tough or hard. Probably could be a little more chewy for me. Adding egg white did not make it cakey. Really enjoyed the feel and taste of brownie. Good chocolate aftertaste.

GP1: Really good texture. Lighter than the first one. Good flavor. Like it better than the last one.

GP2: Really like this one. Tastes really good and is a little fluffier than the last one. Liked it better than Brownie #1.

GP3: This one is good just the way it is. Really good. Wouldn't change this one.

GP4: Really good but maybe a bit too sweet? I don't know. Maybe it's because I just like my brownie with nuts in it.

GP5 (new): Really good. Not too sweet, chewy, really nice flavor. Not cakey (a good thing). I'd make this one at home.

GP6 (new): I think this one is really good, wouldn't change a thing on this. Maybe add some nuts.

So it was unanimous from the GPP (Guinea Pig Panel) that this was "The" recipe to stay with. I'm a bit surprised that it only took 2 recipes to reach this stage. I think I would like to try to see if I can turn up the chocolate taste in this one a bit more since it wasn't as intense as the first one. Also, every GP liked nuts in their brownie, I'm the odd one out.

So for Brownie #3, I'm going to add a traditional nut and a not-so traditional one. I threw my thoughts out to 2 GPs and they both agreed the nontraditional nut might be very interesting and potentially really good. I'll also work on increasing the chocolatiness, too. Maybe using an Ina Graten trick that she's used in the past for her baked chocolate goods.

Postscript: I completely forgot to mention how I liked the Baker's Edge Pan. I thought it did a great job baking the brownie evenly. Every portion I cut was the same as the others. I was a little surprised by the weight of it , much heavier compared to my square baking pan. Although this "might" be a uni-tasker pan for now, I really like it.


Read more!

Friday, March 20, 2009

Oxtail Noodle Soup

Here's the picture from the last post as a teaser. Well, it was sort of a tricky one since it's not duck noodles but rather stewed oxtail noodle soup with roasted duck! Surprise!!

See if I posted this picture (without the duck, of course), it would have been a dead giveaway. hehe.

A couple of weeks back, I decided to get some oxtail from 99 Ranch since they looked so good, even with the sticker shock of $3.99/lb. Sheesh. I haven't had oxtail since I was a little girl (long, long time ago in a galaxy far far away....) and since The Mister has never had oxtail soup, I thought I'd make it (it took a bit of convincing). I followed my Mom's recipe, which was from a very old Chinese cookbook. The recipe is very easy and quite good.

We had one of the eating machines over that night and since I wasn't sure I had enough oxtails for 3 people, I decided to heat up some leftover roast duck from Jasmine Seafood as a supplement. The pairing of the duck and the oxtail was really good! Baby bok choy was the choice of greens that night.

Ingredients:
2 lb oxtail
5 large slices of ginger root
2 green onions (scallions)
1 Tbsp Szechuan peppercorns (I didn't toast mine)
1 star anise
3 Tbsp cooking wine (I used Shao Xing wine) or sherry
8 C water
1 Tbsp kosher salt
Baby bok choy, quartered (I had 3 bunches per person)
1 lb of Chinese dry noodles
Water for blanching oxtail and bok choy

Garnish for each bowl:

1/2 Tbsp green onions, chopped
1 tsp soy sauce
1/4 tsp sesame oil (optional)
pepper to taste

Directions:
Fill a large pot about 2/3 with water and boil. Blanch/parboil the oxtails in boiling water for about 5 minutes. Supposedly this is to get rid some of the "stuff" that you don't want in your soup (blood, impurities, etc.). Remove the oxtail and dump the water.

In a 5 quart dutch oven or heavy pot, add ginger, 2 green onions, Szechuan peppercorns, star anise, cooking wine, 8 cups of water, kosher salt, and blanched oxtail. Bring to boil and then simmer for 2 hours until the meat is soft and the liquid has reduced down to about 6 cups. Add more salt to taste. Set aside.

In a large pot, bring 6 cups of water to boil. Blanch the bok choy until just tender. Remove. Using the same water, cook noodles according to package instructions. The ones I used call for boiling for 4 minutes.

In each bowl, add garnish ingredients. Ladle oxtail broth into each bowl. Add cooked noodles, oxtail and bok choy. And if you just so happen to have some leftover roast duck or chicken, top off with a couple of pieces to finish the dish.

Even though The Mister is not a gelatinous meat type of person, that's my department, he did enjoy his oxtail noodle soup. Eat Machine1 liked it and for once, she didn't finish everything. Those oxtails are pretty filling.

Hope everyone has a wonderful Aloha Friday and a terrific weekend!


Read more!

Wednesday, March 18, 2009

Wednesday Babblings

Just a quickie today. I finally broke down and ordered the Baker's Edge Brownie Pan. I figured it would really come in handy during the Brownie Experiment. I'll have it before the weekend and will try it out on Brownie #2!

A couple of weeks ago, I was flipping through some cookbooks my Mom had given me a long time ago. I don't recall trying a single recipe from these books so I finally decided to try one. I don't have the recipe with me so I'll just stop here and tease you with a picture of the final result. Yum! Looking at this now is making me crave for a big bowl of it. Can you guess what it is?


Read more!

Tuesday, March 17, 2009

Brownie #1

As I mentioned in the last post, I was ready to test out recipe no. 1, which I will call Brownie #1 (original, isn't it?). I had some handwritten notes using Betty Crocker Supreme Brownie mix as a guide. I made notes as I went along the baking process, adjusting ingredients here and there. This is what I came up with. The ingredients I used were what were on hand (like dark brown sugar vs. light brown sugar). I hand mixed everything with a wooden spoon. Review follows the recipe.

Ingredients:
1 egg
1 tsp vanilla
1 3/4 C granulated sugar
1/4 C dark brown sugar
1/4 Canola oil (any vegetable oil would do)
1 stick butter (1/2 cup), melted
2 Tbsp water
1 C unbleached all purpose flour
3/4 C dutch-processed cocoa powder
1/2 tsp table salt

Preheat oven at 325 degrees F.

Grease a square 8" pan. I didn't use a foil or parchment paper sling but you can do that if you prefer. I didn't have a problem getting the brownie out of the pan without a sling.

In a small bowl, mix egg and vanilla. Add sugars and mix well. Add oil, melted butter, water and stir until everything is incorporated.

In a large bowl, combine flour, cocoa and salt. Add the wet ingredients to the dry and mix just until everything is incorportated. It's okay if there are lumps. The reason why I did it this way is because I find that sometimes it's easier and a bit faster to incorporate ingredients this way.

Spread mix into greased pan. Bake for 25-30 minutes, or until a toothpick inserted into the center comes out clean. Cool and cut into squares.

First impression: the brownie had absolutely no rise (not surprised but more on this later), had a great dark color (yea, Callebaut!), and the top was nice and crackly, like Betty Crocker's brownies.

First taste: Very nice chocolate flavor, rich, good sweetness/chocolate balance, very dense, a tad overbaked--the sides were too crunchy but the center cuts were nice and moist. Surprised how rich it tasted with only 1 stick of butter. A slight fudge texture in the center squares.

I had thought about doing a whole "taste test" questionnaire but bah, I was too lazy. I did, however, bring some to work and solicited some of my friends, a Brownie Guinea Pig Panel if you will, to help rate the recipe. No official questionnaires, just verbal feedback. The BGPP consists of 5 guinea pigs, GP1 through 5, me included. Here are the feedbacks from the other 4.

GP1: Edges were too dry, but the flavor was really good. Didn't think it was too sweet, just right. The center cuts were moist. Good texture. Thought would hold up nicely to ice cream without getting all soggy.

GP2: Like it just the way it is. Perfect for brownie sundaes. Tasted really good, and loved the textured. Doesn't want anything changed. Will be a guinea pig for anything I want to bring in for a taste test. (That's so sweet!)

GP3: Mmmm, really good. Can't talk, I'm chewing. When's the next batch? (Okay, I see how this GP is going to be.)

GP4: Tastes good, dense but doesn't seem heavy. Chewy. I like it.

Adjustments for Brownie #2: As I mentioned, there was no rise whatsoever and I think adding some baking powder might help. Reduce the cooking time to 25 minutes (down from 30 min) and when the toothpick comes out just a little crumbly. I also might increase egg to 2 but it might require an adjustment on the flour. I will keep the cocoa to sugar ratio as it for right now since taste was rated pretty high across the panel.


Read more!

Monday, March 16, 2009

The Brownie Experiement

I received my 2 tons of Callebaut cocoa powder Thursday of last week. Actually, it was really 11 lbs but 2 tons sounds funnier. Anyway, I didn't waste any time to start what I've now dubbed my "Brownie Experiment." Would you believe out of 8 different dessert-specific books, there was only 1 traditional brownie recipe? Every other recipe was some sort of spin on the plain brownie (raspberry brownie, swirl brownie, caramel brownie, brownie cheesecake, etc.). Not that those recipes aren't good (at least sounded good) but I really just want a plain brownie recipe without having to buy it in a box.

After 2 hours of searching, reading, and more searching, finally settled on 3 different recipes out of the vast variations, some calling for melted chocolates, others for a combination of chocolates and cocoa powder. I chose the ones that just use cocoa powder, well...because I have 11 lbs of cocoa powder.

The first recipe I made was Alton Brown's Cocoa Brownies. All I can say is these were the worst brownies we've ever tasted. Yes I followed the actual recipe from the episode (which differs from the one posted on FN), no I didn't overmix the batter, no I didn't overbake it. The taste was so bad that I chucked it right into the garbage. Didn't even contemplate bringing it into work to feed the vultures. (Come on, it couldn't have been that bad.) Really, it was that bad. Even if I could get pass the cakey texture (which I didn't like at all), there was no sweetness to the brownies whatsoever. It tasted like a cocoa powder cake. Yuck! The only thing it had going for it was that it was moist. Funny part was that I couldn't even use the Callebaut cocoa powder because AB called for natural cocoa powder! Maybe that's a good thing since it would have been such a waste of good cocoa powder. Not that I think dutch-processed would have improved it. Nothing could have saved the brownies, not even a medicinal herbal addition. Not that I would know anything about those sort of things (really).

Such a dismal outcome made me decide not to even bother with the other 2 recipes. The conclusion I came to was that most of these brownie recipes had too much egg resulting in a cakey like consistency. Hey, if I wanted chocolate cake, I would bake a chocolate cake, okay? Any recipe that called for more than 2 eggs was immediately dismissed. But that left me nowhere. Well, hell, now what?

What was I really looking for in a recipe? If I had to list all the things I want in a homemade brownie, what would it be? Chewy, slightly crispy and firm on the outside, moist, a good balance between chocolate and sweetness (maybe a bit on the sweet side), maybe even decadent to the point where if you have anything larger than a 1" x 1" square, you'll need a tall glass of milk to eat it. Okay, maybe not that decadent.

So what came to mind? I know, some of you are yelling at your monitor right now what you think came to mind. And if you said Betty Crocker, you just won yourself a year's supply of cocoa powder! Just kidding but I do have a pan of AB's brownies that I can send to you (oh wait, those are in the trash).

Can it be? After all that money spent on Callebaut cocoa powder and I'm longing for a pan of BC's brownies? It shouldn't really be a surprise since I grew up with Betty Crocker's Brownie mix, as so did The Mister. We love BC's brownies, chewy and chocolaty (not cocoa'ey, there's a huge difference) and even a little crispy on the sides, moist on the inside. And how do I recreate BC brownies from scratch? I mean is it worth it to make it from scratch when I can just buy BC supreme mix for $2/box? Well, I gotta find some way to use up all that cocoa powder, don't I?

A search of BC recipes didn't result in anything that sounded different than all those other cakey recipes. So thus started the experiment, I am going to come up with my own BC version. I looked up the ingredients and instructions for BC brownies: flour, sugar, egg, oil, dutch cocoa (woohoo!), water and a bunch of additives and other stuff. Okay, that's a start.

So with flour, sugars, dutch cocoa, eggs, oil, butter, I was ready. Coming up, the result and taste test of Brownie #1. (What? That's it? That's like all preparation and no H!) Trust me, stayed tuned. It'll be worth it. And if not, I'll send you a consolation block of AB Cocoa Brownies.


Read more!

Friday, March 13, 2009

Pim's Thai Fried Chicken

What can I say, I love fried foods. And the latest new recipe I tried was Chez Pim's Thai-Marinated Fried Chicken. Pim's secret is using rice flour. I tried rice flour once with the Korean Fried Chicken Wings to see what kind of crust it produced. Rather than mixing in the rice flour with the sauce, I marinated the wings in the sauce alone and then dredged in rice flour. The resulting crunch was nice but the color of the crust had a whitish/grey color. This is what happened with my Thai fried chicken, too.

If you look at Pim's pictures, hers are nice and golden brown.

And you see here mine, it's got some golden brown but didn't turn out as pretty as Pim's. The slight white/grey coloring, almost powderish looking crust was on all of the drumsticks. But it sure tasted good and the crunch was very nice! Maybe I coated mine a little too much with rice flour and should have been more of a dusting, now that I compare my picture to Pim's. In Pim's, you can see some of the chicken and meat, where mine is completely coated. The oil temperature may have been a little too low too since it was taking almost 15 minutes on the first side and another 8 minutes on the second side. I'll have to play around with the heat a bit more. (I figured out why this happened! See my postscript at the end of the post.)

But even if my drumsticks aren't as pretty, they sure were tasty! As a matter of fact, The Mister said he'd rather have these over the Korean Fried Chicken Wings! I don't know if I'd go so far to compare the two since they are 2 different birds (ahem, sorry for the bad pun). They both deserve their own spotlights I think. The Thai fried chicken is salty, savory, and you can just make out the garlic and cilantro taste. The Korean fried chicken is all about the spicy-sweet balance. Different tastes, different crusts. Both really good.

So if you like Asian-style fried chicken, this is one you're got to try!

Postscript: SO! I figured out why my drumsticks were getting the gray color after frying. Thinking about it now, I feel kind of silly that I overlooked such a simple thing. I was at 99 Ranch last week and decided to pick up a new package (different brand) of rice flour. As I was looking over the brands, it dawned on me that the rice flour I had at home which I used for these drumsticks were probably glutinous (mochi) rice flour. I decided to buy a Thai brand of rice flour and when I came home, compared the two and sure enough, that was it! That was my problem, wrong kind of rice flour. Sheesh.

I made a batch with the correct rice flour and it turned out golden brown just like Pim's and tasted even better than with the glutinous rice flour. It was so crunchy and it didn't really matter how much rice flour I had on the drumsticks. I have to agree with The Mister now that I think I like these over the Chicken Alice-style fried wings.


Read more!

Wednesday, March 11, 2009

Sourdough French Bread (Baguette)

Sundays are good days for me to bake bread since they are typically quiet, nonstressful, relaxed kind of day. On this particular Sunday, The Mister was working and I had the day all to myself, a good day to bake bread!

I've had my sourdough starter (from Breadtopia) for almost 5 months now, taking care of it every week or so. Although not neglected in feeding, I have only used it a couple of times in no-knead breads. Haven't been too successful with sourdough NKBs so I decide to try my hand at a sourdough French Baguette using the regular recipe but substituting with sourdough starter. Before I get to the bread, here's a picture of the glass jar that the starter lives in, kept in the back of the refrigerator. You know, in case anyone is curious.


Here's a shot of the inside, bubbly and alive! This was after feeding it 2 times in preparation for the bread.


Instructions are exactly the same as the regular French baguette recipe except the substitution for the starter so I will only list the ingredients and spare the redundancy in directions. Since the sourdough starter has water in it, I had to adjust the amount of water in the recipe. How much is kind of a guess. But it's okay since the amount of flour will increase or decrease to get the right dough consistency. For this one, I over adjusted a bit based on past breads. I didn't take out a 1:1 ratio (reduced liquids by 1/4 C) but a bit more (by 2 Tbsp). Doesn't seem like much but sourdough can be finicky for me.

I also added an extra amount of dry yeast because I wanted to help the dough develop, although according to Breadtopia and my bread book, this isn't necessary. But I thought I'd better since my starter has been somewhat dormant.

Ingredients:
1/4 cup sourdough starter
2 tsp active dry yeast
1/8 cup (~2 Tbsp) warm water (105-115 degrees F)
1 3/4 cups cool water (45-55 degrees F)
5 1/2 - 6 1/2 cups unbleached all-purpose flour
2 tsp salt
Cornmeal (if using baguette loaf pan)


The results were pretty darn good, by far better than the KNB results. The bread didn't have an extremely sour taste as the very first bread I made with the starter but that can be remedied if I feed the starter more the next time. But I liked the overall taste it had. What was interesting is that the bread tasted saltier than the regular so I think I'd cut that back to 1.5 tsp next time. The crust wasn't as crusty as the regular baguette but I had expected that. I noticed the same thing with Panera's regular and sourdough baguettes so I'm thinking it's a sourdough thing.

I think my next sourdough experiment might be a loaf using the basic white recipe. That might be interesting to see how the crust will turn out. It would be great to have sourdough bread without the long wait. But I'll have to see how the taste is without the longer proofing time.


Read more!

Sunday, March 8, 2009

Ina's Brownie Pudding

You know how sometimes a craving hits you when watching/reading something? Okay, so it happens to me more often than not. This time, it was Ina's 40th wedding anniversary dinner episode. I started to watch it for the Italian Wedding Soup but it was the Brownie Pudding that captured my attention. I love a good brownie, one that's crusty on the outside but still chewy on the inside. So the thought of a molten-style brownie sounded really good!


I looked through the pantry didn't have any good dutch-processed cocoa powder, just Hershey's plain ol' cocoa powder. It'll have to suffice (sorry Ina). I didn't have to look through the liquor cabinet to know that the closest thing I had to framboise liqueur was Framboise beer and that wasn't going to cut it. Although the recipe says it's optional, I decided to add in another liqueur, Cointreau, since it also has a sweet flavor, although not like framboise. I also didn't want to invest $29 in a bottle since I don't have any other recipes that calls for it. I guess I could always use it in mixed drinks. Let's see how the recipe is first.


The recipe came together very quickly. The longest part was waiting for it to cool down and debating whether to wait until The Mister got home before spooning into it. If you guessed that I couldn't wait, then you might know me too well. I had to try a little bit of it to see how the Hershey's and Cointreau tasted. The piece I took (in the first picture) was from the side so the inside was a little more set up than what I would expect from an almost "molten" center. But it looked more set up than actual. And it really did have a slight pudding mouth feel. I couldn't taste the Cointreau and the chocolate taste was decent, though I'm sure it would taste better with good dutch-processed cocoa powder. This will really go well with some vanilla ice cream!

Even before I finished this post, I place my order for some Callebaut Cocoa Powder, enough to last me a whole year athough I think I overdid it a bit (ya' think?). And next time I'm at BevMo, I'm going to pick up some Chambord liqueur (love it in mixed drinks) and maybe framboise liqueur see how each works in the recipe.

Hope you are enjoying your Sunday. And did you remember to turn your clocks forward today?


Read more!

Saturday, March 7, 2009

Meatball Sandwichs

Even though the chicken sandwich didn't turn out as good as I had hoped, I tried again but with a simpler approach, the KISS Principle. Things that I know taste good together should give me better results (fingers crossed).

Yup, sometimes the most enjoyable things are the simpler things. This meatball sandwich was really just things thrown together from leftovers. Simple but very delicious. The leftover meatballs and marinara sauce were from the spaghetti and meatball dinner. The baguette was from Panera Bread that I had bought for the chicken sandwich. I used prepackaged shredded mozzarella, something I usually have on hand for quick pizza dinners. Shaved Parmesan cheese would have been good, I think, but I was trying to keep to the Principle so opted to leave it out. Sling these together, toast in the oven, and a wonderful meal in just about 5 minutes. Add a side of marinara sauce for dipping and for good measures.

Don't forget tomorrow is Daylight Saving Time. Move your clocks ahead 1 hour before going to bed. Hope everyone is having a wonderful weekend.


Read more!

Friday, March 6, 2009

Monday on No Reservations - Vietnam (Preview)

For the past few years, I've been living vicariously through Kirk's (mmm-yoso) love of banh mi. On Monday, I'll be able to live through Tony Bourdain since he'll be in Vietnam. Just watch the video below and you'll see what I mean. According to Travel Channel, Tony will be wandering through fish markets, food stands and sidewalk cafes. If the show is anything like this preview, I know I'm going to be hungry afterwards.

You can watch the episode (which apparently is the last new episode until September) Monday, March 9 at 10pm EST on the Travel Channel.


Read more!

Wednesday, March 4, 2009

Wednesday Ramblings

Just a quickie today. A couple of weeks ago, I made French Chicken in a Pot, a meal that was a bit too much food for 2 people. I decided to use the leftover in chicken sandwiches for lunch the next day. Some fresh baguettes from Panera Bread that morning was just the thing I needed.

The Mister had a plain sandwich, chicken, lettuce, mayonnaise, and mustard. I wanted a little something more interesting and thought roasted red bell peppers would be nice. After rummaging through the pantry, thinking I had an unopen jar but didn't, I settled for something a little different using what was in the fridge. Skipping over the stacker pickles and guerre cheese, I opted for goat cheese and pickled beets with some lettuce. Here's the concoction.

Not the most delicious sandwich I've made but it was interesting. It probably could have used mustard but that might have overpowered the goat cheese. Maybe some Ranch dressing or even EVOO and balsamic vinegar would have been nice. Or maybe some sliced peppercinis to give it a punch, but then so would have roasted red bell peppers. Oh well. Nice thought, poor execution, and even poorer stock. But at least we used up the leftover chicken.

And now for something completely different...

It has been 5 months since I've worked on a quilt project. Talk about losing the bubble on something. The last quilt I made was this one for a friend's new baby girl (guess what the baby's name is??). The picture is just of the quilt top that sat there for 2 months waiting for me to get off my rump to finish (sheesh). Since finishing this, I have yet to start my next baby quilt for another friend who had a baby girl a few months back. So I'm posting this, hoping it will motivate me to start planning it and getting it done before that baby goes off to college. (Any bets out there?)

Go ahead, razz me. I need that proverbial kick in the ass. Sigh...is it Friday yet?


Read more!

Monday, March 2, 2009

Hungarian Goulash (Gulyás)

When I received the recent issue (#118) of Saveur last week, I quickly flipped through to find the article on the glazed Hawaiian-style baby back ribs (cover feature). But something stopped me before I could get there. It was the piece on Gulyás, also known as Hungarian Goulash. The Mister immediately came to mind since he loves these type of dishes. So I asked him if he's ever had Goulash.

The Mister: Oh, I love Goulash! My uncle used to take me to this place where they had the best Hungarian Goulash! I would always order it and then have the cheesecake for dessert. You know my grandfather was Hungarian.

Me: He was? I thought he was German?

The Mister: He was, but he was also Hungarian!

Ah, so that makes The Mister German, Croatian, Polish, maybe some Italian, and now, Hungarian. And possibly some other Slavic heritage thrown in here and there!

So after reading the article, The Mister threw a challenge at me to make an authentic Goulash. Huh, I wasn't even sure what authentic Goulash was before reading the article. I, apparently like so many mislead Americans, thought Goulash was just another style of beef stew. Even the mother-in-law was eager to hear about the results when she found out about the challenge.

As usual when trying a new recipe and not really sure how authentic Goulash should taste like, I followed the recipe exactly (you can find the recipe here). The recipe is pretty straightforward. The only thing I couldn't find from the ingredients list was the Italian frying pepper. Not sure what Italian frying peppers were, I did a quick search and found that they are similar to Cubanelle (Anaheim) peppers. Now I was set.

Right off the bat, I had to adjust the heat on my old stove when cooking the onions. The recipe calls for cooking the onions, covered, on medium heat. The heat was too high and started to brown the onions too much, so I adjusted it down one notch.

I tasted the broth after adding the 5 cups of water. It seemed quite bland to me so I added a bit more salt and fresh ground pepper. I also thought it needed it to help flavor the beef while it cooked. After 40 minutes of simmering with the lid on, I added the potatoes. This is what it looked like at the 40 minute mark. There's just a slight layer of oil on top but the broth was starting to get a brown coloring and the meat was starting to get tender. I tasted the broth again and I still felt it needed a bit more salt.

In looking at this, I can see why some people think Goulash is a tomato based soup. The Hungarian sweet paprika really does provide a wonderful rich color as the recipe states.

After another 25 minutes of simmering with the lid off and the potatoes were tender, I added the pepper and tomato. I tasted the broth and it was perfectly seasoned for me. I think that last salt add was just the touch it needed. Cooked it for the final 2 minutes and then plated it up with some fresh sourdough bread.

The Mister said it was awesome. Guess he really meant it because he didn't say a single word while eating 2 bowls of the Goulash. The meat turned out really tender, the parsnip added a wonderful flavor (it might be my new favorite vegetable), and the depth of flavor from the soup was outstanding. Now I love Hungarian paprika but I never knew it could be so good as the primary seasoning.

This was the best beef soup I've ever had. And in all honesty, I wasn't convinced in the beginning that I was really going to like it because I never really got into beef soup or stew (I know, Goulash isn't stew). As a matter of fact, I had 2 bowls of it too.

So there you have it. A winner from Saveur and many thanks to Carolyn Bánfalvi for sharing her mother-in-law's wonderful Gulyás recipe.


Read more!