Saturday, February 28, 2009

Sweet Home Chicago Pizza (Deep Dish)

We've had the flyer for Sweet Home Chicago Pizza laying around on the counter for several weeks now and finally got around to trying their pizza. The Mister, being from New York, have always preferred NY-style pizza but wanted to try a Chicago-style pizza. His last one was over 7 years ago and he couldn't remember if he liked it or not. So on an evening when neither one of us wanted to cook, we ordered delivery.

Sweet Home Chicago Pizza also offers New York-style pizza, which may seem a bit odd for a "Chicago" pizza place. But the story I heard is that the owners of Sweet Home Chicago Pizza purchased the recipe from the previous pizza joint owner (Coney Island Pizza). Guess the new owner wanted to be able to offer the same type of pizza to loyal Coney Island customers. I thought that was pretty nice. So we can get both type of pizza if we wanted to, whatever we were in the mood for. Sweet!

We ordered a 9" (medium) Michael Jordan (sausage and pepperoni) deep dish and added mushrooms and onions ($2.50 for each additional topping for deep dish). If this was a thin-crusted pizza, a 9" pizza would have been too small. So we were a bit apprehensive about the size and whether it would be enough. So as a safety, we also ordered a side of hot wings.

About 45 minutes later, our dinner arrived. And this is what was in the pizza box. Sniff, sniff, smelled delicious!

Here's a cross section of the deep dish. It looks a little saggy because I took the picture after I scarfed down my dinner. I couldn't wait. As you can see, there 2 layers of gooey cheesy goodness, like a pie within a pie.

The sauce was a little bit on the sweet side, like Papa John's a bit. But it had really good flavor and tasted fresh. The crust was not bad but I prefer the crust on a NY-style pizza. Overall, this was a pretty good pizza. Oh yeah, I sliced the dish into quarters and we were only able to eat 1 quarter each. We were shocked! that neither one of us could eat another slice. The size was deceptive for sure.

The wings, although not advertised as Buffalo Wings, were very similar in style. The wings didn't have what it takes to be outstanding. It was okay because the wings were juicy and the sauce was very good. But the skin was limp, and I much prefer a crispier skin. It was served with Ranch, which I like but The Mister dislikes (he's a blue cheese kind of guy all the way).


In all honesty, if we couldn't get delivery, I'm not sure how often or willing we would be to drive here to get deep dish. But since I'm lucky they are so close, we'll be enjoying more of their pizza. I think next time I'll order a small deep dish (which I'm not convinced we will be able to finish in one sitting) and a NY-style pizza as comparison.

Sweet Home Chicago Pizza
14034 Poway Road,
Poway, CA 92064
858-668-3215

Hours:
Mon-Thu. 11:00 a.m. - 9:00 p.m.
Fri-Sat. 11:00 a.m. - 10:00 p.m.
Sun. 11:00 a.m. - 9:00 p.m.


Read more!

Friday, February 27, 2009

Monday on No Reservations - Sri Lanka

If you're like me and know next to nothing about Sri Lanka, its cuisine, its people, its culture, then the next episode of No Reservations will be an eye-opener. According to Travel Channel, Tony will be shown the Sri Lankan culture and cuisine, cuisine influenced by Portuguese, Dutch, British, Indian, Arab, Malay and Moor traders.

While in Colombo, Tony will samplig popular street foods, rides in a tri-shaw, samples lampreis, a local delicacy, and eats a heaping pile of kotu roti. His journey continues onto the smaller seaside village of Seenigama and speaks to villagers about how they rebuilt their town after the devastating tsunami. Once the rebuilding was complete, the unity of the townsfolk led to other projects, like the creation of a culinary school to help Sri Lankan’s learn to properly prepare local dishes. How cool is that?

So don't miss this episode on Monday, March 2 at 10pm EST on the Travel Channel.


Have a terrific weekend!


Read more!

Tuesday, February 24, 2009

Braised Chicken with Mushrooms and Almonds

Braising is a technique that I've really become quite fond. I've used it on short ribs and whole chicken. Since The Mister and I are dark meat fans, I thought I'd try a braised chicken dish with just dark meat. Anne Burrell's recipe for Braised Chicken with Mushrooms and Almonds sounded perfect since we love mushrooms (you can find the recipe here). When I first read the recipe, it was a little confusing to me as to how long it would take to make since I wasn't sure if the total prep time (40 min) included the "inactive" prep time (35 min). I don't really know what is meant by inactive prep time. I thought maybe it was watching the chicken cook while sipping on some white wine, or not. In the end, it took about 2.5 hours, which includes all prep time and cooking time (with a few sips of wine thrown in!).

I only had 6 chicken thighs for the recipe and used the following assortment of mushrooms (starting from upper right): Shiitake, Oyster, Button, Portabella, and Cremini also known as brown mushrooms (center).


Here's what the thighs looked like after searing (searing took about 6 minutes on each side). The skin is very crispy with most of the fat rendered out.

I used about 2 lbs of mushrooms like the recipe calls for but it was a bit more than what the dish needs. That is unless you like a little chicken with your mushroom dish. I'd say you can get away with 1 - 1 1/2 lbs of mushrooms.

After cooking down the onions, mushrooms, and garlic, it was time for the wine. I used the whole 2 cups of wine but think I'll reduce that to 1 1/2 cups of wine the next time since I like a little more milder wine flavor. Once the liquid has been reduced by half, I added about 3 cups of broth to just cover the thighs. Here's what it looks like right before simmering for 30-35 minutes.


I decided to make more garlic mashed potatoes since my Yukon Golds were getting a bit old. And I thought the sauce from the chicken would go really well with mashed potatoes.

Here's another shot of the final dish plated. A large scoop of garlic mashed potatoes, layered with 2 braised chicken thighs, some sauce and lots of mushrooms.

It was a very tasty and hearty dish. The almond puree added a lot of flavor and pop to the sauce although I had an "ah-ha" moment when I added it. Wonder if I could substitute it with almond paste or almond butter? Might try that next time to save time on blanching the almonds (I had to blanched my own almonds because I couldn't find any when I went to the store, a bit time consuming). Definitely a dish I'll make again and with some minor adjustments on wine and salt, it could be outstanding.

Hope everyone is having a great week. Now go and eat well.


Read more!

Sunday, February 22, 2009

Da Mister's Breaded Pork Chops

One of my all-time favorite is The Mister's breaded pork chops. Thin cut, juicy pork chops fried to perfection. When he makes this dish, I make sure I stay out of the kitchen to let him do that voodoo that he do(es) so well. I've only helped with this recipe a couple of times but soon realized that it was best to just stay the hell out of his way and not mess with his OODA loop if I want my pork chops.


The recipe is similar to other recipes except that the chops are dredged in flour and bread crumbs separately. Many of the recipes out there calls for combining of flour and bread crumbs. Some only call for bread crumbs. But I believe The Mister's method (IMHO) creates the best crust I've ever had. Also, using thin-cut pork chops eliminates the need to finish off in the oven after frying, ultimately requiring less time to cook and ensuring juicy chops! (Who wants to eat dry flavorless chops?)

I will try my best to convey his method and the amount of ingredients but like me, he likes to eye-ball things and adjust accordingly as things progress. The amount of flour and bread crumbs will need to be adjusted depending on how heavily you coat your chops and how large the chops are. The recipe can be halved but we like to have leftovers. These are thin-cut chops so 8 chops will feed about 3-4 people.

Ingredients:
8 thin-cut bone-in pork chops
All purpose flour (~2 1/2 cups)
Italian seasoned bread crumbs (~2 1/2 cups)
3-4 large eggs, lightly beaten
Oil for frying (he likes Canola oil)

In a large Dutch oven or heavy pot (he uses a 7-quart Dutch oven), pour enough oil to come up the side of the pot about 1". Heat oil to 375 degrees F.

Dredge pork chop in flour, shaking off the excess. Dip the chop into egg and coat completely. Dredge chop into bread crumbs. Pat down gently on the bread crumbs to ensure coating is even. Set aside and repeat on remaining chops.

When oil reaches 375 degrees F, add breaded chops into the pot, making sure not to crowd the pot. He can usually get 3 fairly good size chops in our 7-quarts DO. The oil temperature will drop down to around 320-325 degrees (this will vary depending on the pot used), adjust the heat to keep the oil temperature around 320 degrees. Fry the chops until bottom is golden brown, about 6-7 minutes. Flip chops over and continue to fry until second side is golden brown, about another 4-5 minutes. The chops should register 160 degrees F when done. Make sure to check the meat near the bone since if any part of the chop will be undercooked, it will be near the bone. Remove chops to paper towels. Continue frying the rest of the chops. Serve hot. We usually have the chops with steamed sweet corn and stuffing. It would also go great with garlic mashed potatoes.

Hope everyone is enjoying their weekend. Now go and eat well.


Read more!

Saturday, February 21, 2009

Monday on No Reservations - Disappearing Manhattan

I am really looking forward to this episode. Some of you know that Tony grew up just outside New York City, Manhattan. Some institutions of his youth are still going strong, some are hanging on by a thread and some luck, and some of which have since disappeared. Tony wants to remember 'his' Manhattan by visiting some of his favorites while he still can. Tony will be talking and eating with some notable guests, visit some of the oldest, most classic, and undoubtedly-NY restaurants. These cherished landmarks, such as Katz's Deli, Russ & Daughters, Hop Kee (check out the sneak preview below, makes me want to make some wonton soup for dinner!), and Sammy's Romanian, have become the heart and soul of this great city and its proud and honorable culinary history rich with cultural and ethnic diversity.

Unfortunately, due to the changing times, these establishments are in danger of disappearing off the NYC cultural map. Tony refers to this beautiful episode as his love song to the great city of New York.

Watch Anthony Bourdain: No Reservations Disappearing Manhattan Monday, February 23 at 10pm EST on the Travel Channel.


Read more!

Friday, February 20, 2009

Aloha Friday!


A little Spam Musubi to celebrate Aloha Friday!

Have a great weekend!

Postscript: I forgot to mention the Silver Bay Kennel Club Dog Show is at the Del Mar Fairgrounds this weekend. If you're looking to see a particular breed, go here for Saturday and here for Sunday's judging programs to find the ring number and the breed.

Hours:
Friday, 8:00AM-6:00PM
Saturday, 8:00AM-7:00PM
Sunday, 8:00AM-3:00PM
Price:Free admission
Location: O'Brien, Bing Crosby and Exhibit Halls
Parking: $9.00


Read more!

Wednesday, February 18, 2009

Spaghetti and Meatballs

I remember having a blast at the Old Spaghetti Factory as a kid with my then-best-friend and her family. We used to get the spaghetti and meatballs with a Shirley Temple chaser. A couple of kids thinking they were so cool. Ahhh, good times. Somewhere along the path of growing up, meatballs fell out of favor. But then, several foods from my youth just doesn't have the same appeal now. But I still have the fond memories and you know what they say, you can't go home again.

The Mister still loves pasta and meatballs. Frozen store-bought meatballs are a common thing in the freezer although he doesn't make them much anymore. Having a ready supply of
bolognese sauce doesn't help the meatballs' case either. But maybe store-bought has been the problem all along. Maybe my eschew to bland clumps of dry meat has given meatballs an unfair reputation. And with Anne Burrell's help, maybe I can go home again, at least just to visit for a short while.

Linguine and Meatballs in Marinara Sauce

You can find Burrell's recipe here. Fair warning, she likes to use a lot of salt, I mean *a lot* of salt. I'm a salt-aholic but even her proportions are a bit much for me. I recommend starting with what you're comfortable with and then increase as you see fit.

I couldn't find any ground veal and wasn't in the mood to grind my own. So I decided to make ground beef and ground pork meatballs. I used a 2:1 ratio of ground beef to ground pork, yielding the 1 1/2 lb of meat that the recipe calls for. (BTW, to the person who commented on the recipe that her family doesn't eat pork or beef and made it with turkey and veal, you might want to look up what veal is before you make anymore meatballs.) Other than the meat changes, I pretty much followed the recipe. The size of the meatballs were a bit larger than golf balls and yielded 22 meatballs. Here are the ingredients that I used.

Ingredients:
Extra-virgin olive oil
1 large onion, 1/4-inch dice
Salt
2 cloves garlic, smashed and chopped
Pinch crushed red pepper
1 lb ground beef
1/2 pound ground pork
2 large eggs
1 cup grated Parmigiano
1/4 cup finely chopped fresh Italian parsley leaves
1 cup breadcrumbs
1/2 cup water

The onions are cooked in olive oil until very soft and aromatic, then garlic and pepper flakes followed. I knew when the onions were done cooking that there was a tad too much but I added it all to the meat mixture anyway (building the baseline). I even used a medium sized onion but maybe Burrell and I have different perspectives of what a large onion is.

When browning the meatballs in the pan, the surface onions were falling off the meatballs, which required removal after each batch. I didn't roll the meatballs tight, just enough to give shape and they would hold together. So maybe some of the surface onions didn't adhere as well.

It didn't take long to brown the meatballs since the purpose is just to brown and not to cook them all the way through. So don't worry if parts of the meatballs are still pink. The oven will take care of the final cooking. Keeping the pan lubed with olive oil will help keep the meatballs from sticking. If they do stick, don't try to move them. Once they are sufficiently browned on the bottom, they will release on their own. A little trick I found that helps prevent meatballs from sticking is to shake the pan back and forth as I'm adding the raw meatballs. This will coat the meatballs in oil.

Once browned, the meatballs go into a preheated 350 degrees F oven for about 15 minutes. My meatballs were on the smaller side, so I checked them at 12 minutes and they were done. Here they are out of the oven. The whole house will smell amazing at this point!


I also decided to make Burrell's marinara sauce since I'm sure her sauce is suppose to match well with the meatballs. I used thick cut smoked bacon since I still can't find a source close to home that carries pancetta. The other thing I changed was using crushed tomatoes instead of canned Italian plum tomatoes. I don't have a food mill and really didn't want to go through all that hassle. I thought the marinara sauce turned out pretty good but was a bit on the acidic side. I added a pat of butter, which help reduced the acidity a bit.

Funny thing I noticed is that although we have frozen meatballs as a stock item, we didn't have spaghetti on hand. So linguine it was. Here's a close-up of the final dish.

So did I go home? Did I travel back to the giddiness of sipping cherry sweetened nectar of youth? Not quite but it was pretty good. I think I need to adjust the meatballs more to my liking. They were tender and very flavorful but the taste is not quite where I would like it. Things that I would adjust are: amounts of onions, salt, bread crumbs and Parmesan cheese. I think I'd also like to try to cook some tomato paste with the onions the next go around to give it more depth. And if I ever can find a good source for ground veal, I'd add that too. I'll report back the results, of course.

The recipe made more meatballs than what we could eat that night but leftovers, including the marinara sauce, made for good meatball sandwiches the next night (post to come). Extra meatballs can be frozen for later use, too.

On a side note, Anne Burrell's Secret of a Restaurant Chef has been the only new show on Food Network's new line-up that I found enjoyable. Maybe it's her quirkiness and wiggly style but I think it's more of her approach to food that appeals to me. Hopefully she'll provide some much needed inspiration for some new dishes (with my own adjustments, of course).


Read more!

Monday, February 16, 2009

French Chicken in a Pot with Garlic Mashed Potatoes

The weather has been cold and wet and what better way to stave off dreary weather blues than a hearty chicken dinner. I saw this recipe either on Cook's Country or America's Test Kitchen (I can't remember which one) and knew immediately that The Mister would love it. A very straightforward slow cook recipe that results in a very tender and juicy chicken.


The recipe states a chicken between 3 1/2 to 4 1/2 lb will take about 1 hour to cook, while a 5-6 lb will take between 1.5 to almost 2 hours. I used a 5 1/2 lb chicken, which took approximately 1.5 hours.

I'm sure chicken parts can be used instead of a whole chicken but just make sure you check on the meat temperature for doneness a littler earlier since chicken parts will cook faster than a whole chicken. The recipe also recommends not using a chicken larger than 5 lb if cooking in a 5-quart pot.

The only change I made to the recipe is adding 2 carrots and increasing the celery to 2.

Ingredients:
1 whole roasting chicken (4 1/2 to 5 pounds), giblets removed and discarded
2 teaspoons kosher salt or 1 teaspoon table salt
1/4 teaspoon ground black pepper
1 tablespoon olive oil (I used extra virgin)
1 small onion , chopped medium
2 small stalk celery , chopped medium
2 small carrots, chopped medium
6 medium garlic cloves, smashed, peeled and trimmed
1 bay leaf
1 medium sprig fresh rosemary (optional)
1/2 - 1 teaspoon juice from 1 lemon

Directions:
Preheat oven to 250 degrees F and adjust the oven rack to the lowest position.

Pat the chicken dry with paper towels. Season the entire chicken with salt and pepper. I like to season the inside cavity, too.

Heat oil in a large Dutch oven (I used a 7 1/2 quart DO) at medium heat. When the oil is just smoking, add the chicken breast-side down. You should hear a good sizzle. Add the celery, carrots, garlic, bay leaf, and rosemary into the pot. Cook until the breast is lightly browned, about 4-5 minutes.

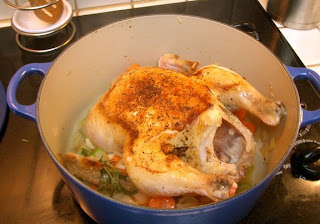
Flip the chicken over. I used a large, sturdy wooden spoon inserted into the cavity to flip it. Continue cooking with breast-side up until chicken and vegetables are well browned, ~6-8 minutes more. Here's what it looked like after flipping.


Remove DO from heat. Place a large sheet of foil over the pot and cover tightly with the lid. This will ensure all the steam stays within the pot. Transfer the DO to the oven and cook until the breast registers 160 degrees F in the thickest part and 175 degrees F in the thighs. See above regarding roasting time.

Take the chicken out of the DO and onto a carving board that has grooves to catch juices. Tent with foil and rest for 20 minutes. I just reused the foil from the pot. I was nicely surprised that the majority of the browning stayed on the breast (the show stated that the chicken would lose quite a bit of the browning).


Strain chicken juices from the pot through a strainer into fat separator. I pressed on the solids to extract some of the yummy liquid goodness. This should yield about 3/4 cups of juices. Discard solids. You should have about 3/4 cup juices. Allow liquid to settle 5 minutes, then pour into saucepan, leaving out the fat, and set over low heat.

Carve the chicken and adding any accumulated juices to saucepan. Add lemon juice 1/2 teaspoon at a time into jus to taste. I added about 1 teaspoonful. Serve chicken with jus on the side. You'll have plenty of jus leftover but don't throw it away. See note at bottom of post.

I served the chicken with a side of garlic mashed potatoes. The garlic mash potatoes are very easy to make. The following will make about 2-3 servings.


Ingredients:
2 lbs Yukon Gold potatoes, peeled and quartered
4-6 cloves of garlic, smashed and peeled (add more or less to taste, we like a lot of garlic)
~1/3 cup heavy cream
Kosher salt
Fresh ground black pepper

Place potatoes and garlic into a large pot and cover with water. I usually add enough water to come up about 1" above the potatoes. Salt the water (I add about a good tablespoon). Bring everything to a boil on high heat. Reduce heat to medium and cook the potatoes until a parring knife can go through the potato fairly easily with no resistance. Be careful not to overcook the potatoes.

Drain the potatoes and put back into the pot. Don't forget to put the garlic back in, too. Use a potato masher to mash the potatoes and garlic together until no more lumps. Add heavy cream to mixture. Use the masher to incorporate the cream into the mixture. Add salt and pepper to taste. Serve hot.

If you like your mashed potatoes creamier, you can add another 1/4 cup of heavy cream.

Side note on leftover jus: The jus contains a lot of flavor (from all those broken down connective tissues!) which can be used to flavor many things (soup stock, sauteed mushrooms or onions, etc.). It will congeal when cold, which makes defatting so much easier, and can be stored up to a week in the refrigerator. You can also freeze it, too. I used some leftover jus to heat up some leftover chicken for sandwiches the next day (post to come).

Hope everyone has a wonderful week. Now go and eat well.


Read more!

Saturday, February 14, 2009

Monday on No Reservations - Philippines

I just watched the preview of Monday's No Reservations and I am starving! Tony will be visiting the Philippines. One of Tony's host will be Augusto, a runner up from the Fan-atic special, which aired last season. Although Augusto wasn't picked, he made an impression on Tony, and in turn, he is treated to a reunion with his family and 'the best pig…ever' at a spectacularly large cookout. (Did someone say pig? How do I get invited to that party?)

Tony also delves deep into what exactly it means to be Filipino by exploring their history and the many prominent cultures of the islands. He travels to Manila, Pampanga, and Cebu, visiting a dampa and dining on adobo shrimp, sisig, crab (I'm told to keep a look out for the stuffed crab), goat heads soup, ox tail and of course, lechon. (Lechon is one of my favorites!)

Anthony Bourdain: No Reservations Philippines airs on Monday, February 16 at 10pm EST on the Travel Channel. You can also read Tony's post about the episode on his blog on Monday.

Have a wonderful weekend. Now go and eat well.


Read more!

Wednesday, February 11, 2009

Star Anise Thai Cuisine

A friend suggested lunch at Star Anise Thai Cuisine. She's been there a couple of times and thought the food was pretty good. Hate to say it but she wasn't building up any confidence in me about the place. I've seen the restaurant in the Renaissance Mall but it never struck me as anything more than a Spices Thai Cafe knock-off. Don't get me wrong, I like Spices for a quick lunch but have yet to find another similar styled restaurant that is as good as Spices. But then if you really want good Thai food, there's no beating Sab-E-Lee.

We were the first to arrive for lunch. The place is very clean, white table clothes and all. As we were being led to our table by the window, we noticed a little boy playing with one of those Swiffer dusters. I think he was the waitress' son. The little boy was so cute, obviously trying his best to help mom and dad.


I don't recall any music in the background and quite frankly, I prefer no music anyway. The lunch menu looks to be the typical fair, pick a dish and choose your meat. My friend ordered her usual Panaeng Curry with chicken. She said the sauce is very good. I was torn between the spicy fried rice and the Spicy Khee Mao Noodles but ultimately went with the spicy noodles (I am so predictable). We had a choice of house salad and Tom Yum soup. I chose the soup, my friend decided on the salad. I forgot to take pictures of both but neither really stood out for me. The soup was similar in taste to the Tom Yum soup from Spices except it had more of a seafood flavor. The salad looked a little like cole slaw. And hindsight, they certainly were indications of what's to come.

Panaeng Curry with Chicken

The Panaeng Curry, according to my friend, was just as good as last time. She ordered a spiciness "1" (that's basically no heat). I liked the use of green beans and not the usual large chunks of green bell pepper I've seen in other restaurants. I also liked the fact that they only used red bell peppers. I didn't taste the dish but my friend enjoyed her meal very much.

When my Spicy Khee Mao Noodle with Beef was put in front of me, I knew just by looking at it that I was going to be disappointed.

Spicy Khee Mao Noodle with Beef

Those 2 burnt-looking fried wonton thingy in the upper left hand were Curry Puffs, supposedly stuffed with curry mashed potatoes, peas and carrots. It was not very good. I think I would have preferred a crispy spring roll. The dipping sauce is the standard plum sweet sauce.

The noodles were broken into small pieces and the only sign of "wok hay" was on the eggs. The noodles were cooked fine and weren't clumpy, which was good. Some pieces of the beef were tender but there were a few rather dry pieces, but not bad but lacked any real flavor. I liked the fact that my dish only had red bell peppers (again, no green bell peppers is always a plus for me).

So far, you would think this was a not-so-bad dish. But what pushed it down to a sub-par dish was the void of flavors other than the smidgen heat, which wasn't even that much for a "medium" heat order. I would rate the heat more of a mild 3 (scale of 1-10). I think a touch of soy sauce and a bit more hot sauce would have improved the flavor.

Service was very efficient, and the servers were pleasant. Cost for our meal was a little over $18, without tip, in line with other local Thai restaurants of similar nature. By the time we left, around noon, the restaurant was starting to fill up. Overall, Star Anise offers a run-of-the-mill, Americanized Thai lunch menu that probably satisfies your average dinners. But for me, I think I'll stick with my usuals.

Star Anise Thai Cuisine
8935 Towne Center Drive #115
San Diego, CA 92122
Tel : +1 858 535 1668
Fax : +1 858 452 5899
Lunch Mon - Fri 11:00 AM - 3:00 PM
Sat - Sun 11:30 AM - 3:30 PM
Dinner Sun - Thu 5:00 PM - 9:30 PM
Fri - Sat 5:00 PM - 10:00 PM

Postscript: I forgot to mention that on the way out, I noticed several of the other diners were enjoying the Panaeng Curry. You know how some restaurants do one type of dish well and the others so-so? Maybe Star Anise whips up a mean Panaeng Curry?


Read more!

Tuesday, February 10, 2009

Q & A

One side effect of maintaining a blog (if you want to call it that) is getting emails from readers containing questions that are interesting, funny, informative, and well, bizarre. Here are some more entertaining questions I've gotten to date (unedited). Please, keep those emails and comments coming! It's better than hearing crickets from where I am!

Q: So what are you some kind of culinery or something?
A: You do realized that culin'a'ry is an adjective, right? I suppose I'm something. At least that's how my teachers always described me, "Yeah, you're something alright."


Q: What is a plumies and why is it barefooted?
A: It's short for plumeria, aka frangipani. They don't have feet. But I do and my toes get claustrophobic and will only allow socks on them under extreme Antarctic conditions.


Q: Are all those recipes yours?
A: Have you actually read any of the posts on this site?


Q: I have a friend who is a French chef and he has taught me everything I know about cooking. He is a great chef and you don't need to go through all of that to get the best rib roast because told me that you should put cloves of garlic into slits the rib roast to give it all the flavor it needs. You don't have to put oil it one or rub or go through all that trouble. It will just ruin everything...
A: Wow, did you breathe at all while typing that? Maybe your chef friend can refresh your memory on how to use punctuations. Maybe I need to put slits in my wrists and stuff some garlic in them after reading this.


Q: I knew a guy named Keith who lived in Aiea that could really cook. Do you know him?
A: Why yes because anyone who has ever lived in Hawaii knows everyone on the islands!

On a serious note, I want to thank those who have visited my humble blog during the past few years, especially those who keep coming back. Also, special thanks to those who have taken the time to comment and provide feedback. I do truly appreciate your feedbacks.

Now go. Really, get out of here. Go do something, and don't forget to eat well. Have a great week!


Read more!

Saturday, February 7, 2009

Braised Short Ribs


Every time I've opened the freezer door the past 3 weeks, 2 packages of frozen thick short ribs have been staring up at me. They've been begging to be cooked. I originally bought them for Dr. Pepper Pineapple Short Ribs, and since I haven't been in the mood for DPPSR (sounds like some kind of condition), I had to come up with something else since I couldn't bear another weekend of those darn ribs staring at me. Besides, The Mister asked, "What are you going to make me for dinner that's tasty?"

Shaaaa, everything I make is tasty. Well maybe not everything but if he says that again, I'm going to give him something...oh never mind.

The great thing about short ribs is that they can be wonderfully delicious if cooked slowly, creating fall-off-the-bone tender and buttery meat. But since it was a work night, time was not a luxury so I had to work fast.

I dug through various recipes and once again, didn't find one that inspired a whole lot. So I pulled together some ingredients and using some tried-and-true cooking methods, came up with a pretty darn "tasty" dish. (How ya' like them apples, da Mister?? I'll give you something tasty!)

Most braised short ribs recipes called for serving with mashed potatoes or rice. I didn't have any potatoes and wasn't in the mood for rice (What? An Asian not in the mood for rice???) I was actually in the mood for some pasta so decided to serve the braised ribs with elbows. You choose the starch you want, of course.

I only had time to slow cook the short ribs for 2 hours but probably needed another 1/2 hour for the meat to be completely falling apart. But no matter because it was long enough for the meat to become buttery (ah, like butta) and tender enough. The sauce was excellent with Marsala wine and a touch of vinegar, although I couldn't taste the vinegar. Just nice, beefy flavor, good depth. Went nicely with the elbows but would have been great too with rice or mash potatoes.

As The Mister polished off his 4th short ribs, he muttered, "Mmmm, I'll definitely have this again. Delicious, Honey!" Uh, he forgot to say tasty.

I had some Creole-style seasoning already made so I used that as a rub. It consists of Hungarian paprika, kosher salt, garlic powder, onion powder, ground black pepper, cayenne pepper, dried oregano and thyme leaves. But feel free to use whatever seasoning you have around but try to add some Paprika and cayenne pepper on it.

Ingredients:
2 tablespoons vegetable oil
4-5 pounds short ribs with bone
2 tablespoons seasoning
1 cup chopped onions
2 stalks of celery, chopped
2 carrots, chopped
1 (14.5 oz) can diced tomatoes (Hunt's recommended)
2 tablespoons chopped garlic
1/4 cup rice vinegar (can substitute regular vinegar or red wine vinegar)
1/2 cup Marsala wine
2 tablespoons Worcestershire sauce
3 bay leaves
2 teaspoons black pepper
~2 quarts beef broth
Chopped flat leaf parsley, for garnishing

Directions:
Heat oil in a Dutch oven or a large, heavy pot over high heat.

Cover short ribs with seasoning, patting seasoning well into the meat.

When pot is nearly smoking, add the ribs and sear on all sides until they form a brown crust. Don't overcrowd the pot so do it in batches if you need to. Remove the browned ribs from the pot.

If there's a lot of oil left after all the ribs have been browned, drain out excess oil, leaving about 2 tablespoon in the pot.

Add onions, celery and carrot; saute about 2 minute to brown lightly. Add in garlic and saute for another minute so the garlic becomes aromatic. Add back the ribs and stir in tomatoes, rice vinegar, Worcestershire sauce, Marsala wine, bay leaves, pepper and enough broth to just cover ribs. Bring to a boil, reduce heat, cover and simmer until very tender, about 2 - 2 1/2 hours.

Serve over your choice of starch. Be sure to spoon some sauce over everything and garnish with a sprinkle of chopped parsley.

Here's a close-up of the final dish. Tasty, indeed!

Hope it's drier for you than it is for me here in San Diego this weekend. Nonetheless, have a good weekend. Now go and eat well.


Read more!

Friday, February 6, 2009

Monday on No Reservations - Food Special

The actual title of this special is "Food Porn." But I didn't want to add certain words in the title to try to minimize the uh...unwanted hits, if you know what I mean.

Tony will be joining Eric Ripert, Alan Wong (yea!), Martin Picard and other world renowned chefs to share some of his favorite examples of what he likes to call food porn. Those of us who read food blogs and/or blogs about food know what he means.

In this special episode, Tony presents an XXX selection of all that's lip-smacking and luscious in the food world. Dishes featured on the show range from crispy pork skin tacos, steaming pho (can't wait to see what kind of pho he gets), hot & drippy cheese based dishes, serious chocolate and of course, a pig feast. As Tony says, it's 'just filthy.'

Are you ready for still-squirming octopus tentacles, the dirty "business end" of a warthog, codfish sperm, or the bitterly juicy eyeball of a freshly-killed seal, there are some dishes around the world that provide disgust for some, yet immense gratification for others? You better because that's what we'll be seeing. But whatever it is that tickles your fancy, it can't be denied that food and pleasure go hand-in-hand.

Tune in Monday, February 9th at 10pm EST for this food special on No Reservations on the Travel Channel.


Read more!

Thursday, February 5, 2009

SideSwipe Spatula Mixer Blade

I received the SideSwipe Blade for my KitchenAid stand mixer about a week ago. This was a Christmas present from The Mister but the blade has been on backorder since the holidays. I'm sure part of the reason (other than it being the holidays) for the backorder was due to the recommendation by Cook's Illustrated. And since I love my gadgets, and having watched the video of the blade in action, this was definitely on my "have-to-have" list.

The SideSwipe blade has little silicone fins on the side that scrapes down the side of the bowl while mixing. For anyone who uses a stand mixer knows all about having to scrape down those sides when mixing ingredients. I knew exactly which recipe to test the new blade, the Vanilla-Vanilla Cupcakes. The recipe, although simple, does require quite a bit of scraping down of the bowl for both the cake batter and the vanilla buttercream frosting. What better recipe to test the new toy out!

The blade fitted perfectly on the Pro 6. I ran the blade in an empty bowl just to see and the fins did hit the sides, quite loudly as a matter of fact. I had to lower the height of my mixing bowl so that the bottom fins just touched the bottom of the bowl.

I prepared the cake batter as usual and the blade worked exactly as advertised. A note from the manufacture that the blade might leave a narrow stripe of ingredients just above the top path of the blade when making large batches of thick dough. So a little bit of scraping down may be necessary when working with large batches. But even with my double batch required no scraping, not once.

A few things I noticed. Little bits of butter were wedged into the corners on some of the ridges. The amount was minimal to where I didn't feel it necessary to stop and scrape the fins.

Some dry ingredients that get onto dry parts of the silicone stuck and didn't incorporate. Again, this was a very small amount and I didn't feel the need to stop and scrape off the dry ingredients.

I knew going in that I had to adjust the mixing time but I was so enthralled by the blade action, I forgot to monitor the final mixing stage of the cake batter. The blade mixed the batter so well and so quickly, I overmixed the batter a bit. This would be a very big thing to remember when working with batter that should not be overmixed. Thank goodness I snapped out of my stuper quick enough to still have a decent batter. Although I didn't time the mixing, my guess is that it cut down the mixing time by half for both the cake batter and the frosting. All I can remember was that is was quick!

I especially liked the blade for mixing the buttercream frosting. A double batch meant I had to encorporate 5 cups of shifted powdered sugar to the butter. That's a lot of mixing. But the blade encorporated each addition so fast that the frosting was done before I knew it. And it worked through a slightly stiffer mix (compared to the cake batter) with no effort. The other thing to note is that not only to adjust for mixing time but also the speed of the mixer. I used a lower speed for both the batter and the frosting. Read through the FAQs for other things to consider.

With some minor adjustments, overall, this is a very good investment at $29.95 ($24.95 for tilt bowls) and worth every penny for me. SideSwipe has a new, narrower blade coming out soon. Check their website for dates.


Read more!

Wednesday, February 4, 2009

Clams Casino

This recipe for Clams Casino was a favorite of my father-in-law. It's a favorite appetizer for us and the best part is that it can be made ahead of time and then baked just before serving.

The Mister thinks the recipe came from a friend of his father's who got it from a restaurant owner. So, uh, guess that's a friend from a friend.

We love this recipe but where this recipe can go wrong is adding too much breadcrumbs or vegetables. I recommend adjusting both of those to your taste. Also, Clams Casino tends to be on the salty side. So if you want to cut down on the saltiness, use lower sodium bacon.

Ingredients:
1/2 lb bacon, chopped finely
1 medium onion, chopped finely
1/2 red or orange bell pepper, diced
1 stalk celery, diced
1 small carrot, diced
3 (6 oz each) cans of clams (minced, chopped, whole, combination of)
1 tsp parsley flakes
1 Tbsp lemon juice
3/4 - 1 cup Italian bread crumbs
1/4 cup grated Parmesan cheese, more to sprinkle on top

Preheat oven at 350 degrees F.

Sauteed bacon in large pan until crisp. Add onion, red bell pepper, celery and carrot. Cook at medium heat until vegetables are soft (about 4-5 minutes). Drain and reserve the juice from 1 can of clams. Add clams with juice from 2 cans and 3/4 cups of breadcrumb to pan. Cook mixture for 2 minutes. If the mixture is too wet, add 1/8 cup of breadcrumbs at a time, mixing well after each addition. The texture should be similar to stuffing. I don't like too much breadcrumb filler but need enough to bring everything together. Add parsley, lemon juice, and Parmesan cheese. Mix well.

Transfer mixture to baking pan. I use a 9-inch Pyrex pie pan. Sprinkle Parmesan cheese on top. Bake at 350 degrees F for 15-20 minutes, the edges will turn slightly darker than the center. The main thing here is to heat everything all the way through and to slightly crust the top.

After removing from oven, if the mixture is too dry, pour some of the leftover clam juice over the mixture. At this point, it can be served as is with crackers or toasted bread (or anything else you like for that matter). Here's a picture of the center of the mixture after baking (sorry, a little unsteady with the camera).


Or if you want to get all fancy, put cleaned halved clam shells on a baking sheet and fill each shell with a scoop of the mixture. Then broil the clam shells for a couple of minutes to brown the top. Serve hot with lemon wedges and/or hot sauce.

We love it with lots of various hot sauce and Ritz crackers. This is how I eat it. You can see the chunks of clams, bits of vegetables and bacon.


Hope y'all are having a good week. Now go and eat well.


Read more!